Application SSO Setup
The purpose of this section is understand the setup instructions for Desktop-based, Browser-based, and Windows Login Application Single-Sign-On (SSO).

For more information about the OmniDefend SSO Solution, visit OmniDefend SSO
Note
As a prerequisite to this section, please install the
OmniDefend Client Bundle, theOmniDefend MFA Browser Extension, and theOmniDefend SSO Browser Extension. Also make sure that the user is already enrolled in OmniDefend MFA.
Legacy Desktop Applications
This documentation will demonstrate how to provision OmniDefend password-fill SSO onto a legacy desktop application.
1. Portal Login
To setup a desktop application with OmniDefend SSO, first login to the portal as an admin. As you can see in the images below, the OmniDefend Client icon in the Windows system tray should change once login is succesful.
Logged Out:

Vs. Logged In:

2. Application Launch
Next, launch the desktop application which you wish to provision in OmniDefend. For this documentation, we will use the example of Microsoft SQL Server Management Studio.
3. Run Wizard
After launching the application, right-click the OmniDefend system tray icon and left-click
Run Wizard. See the image below: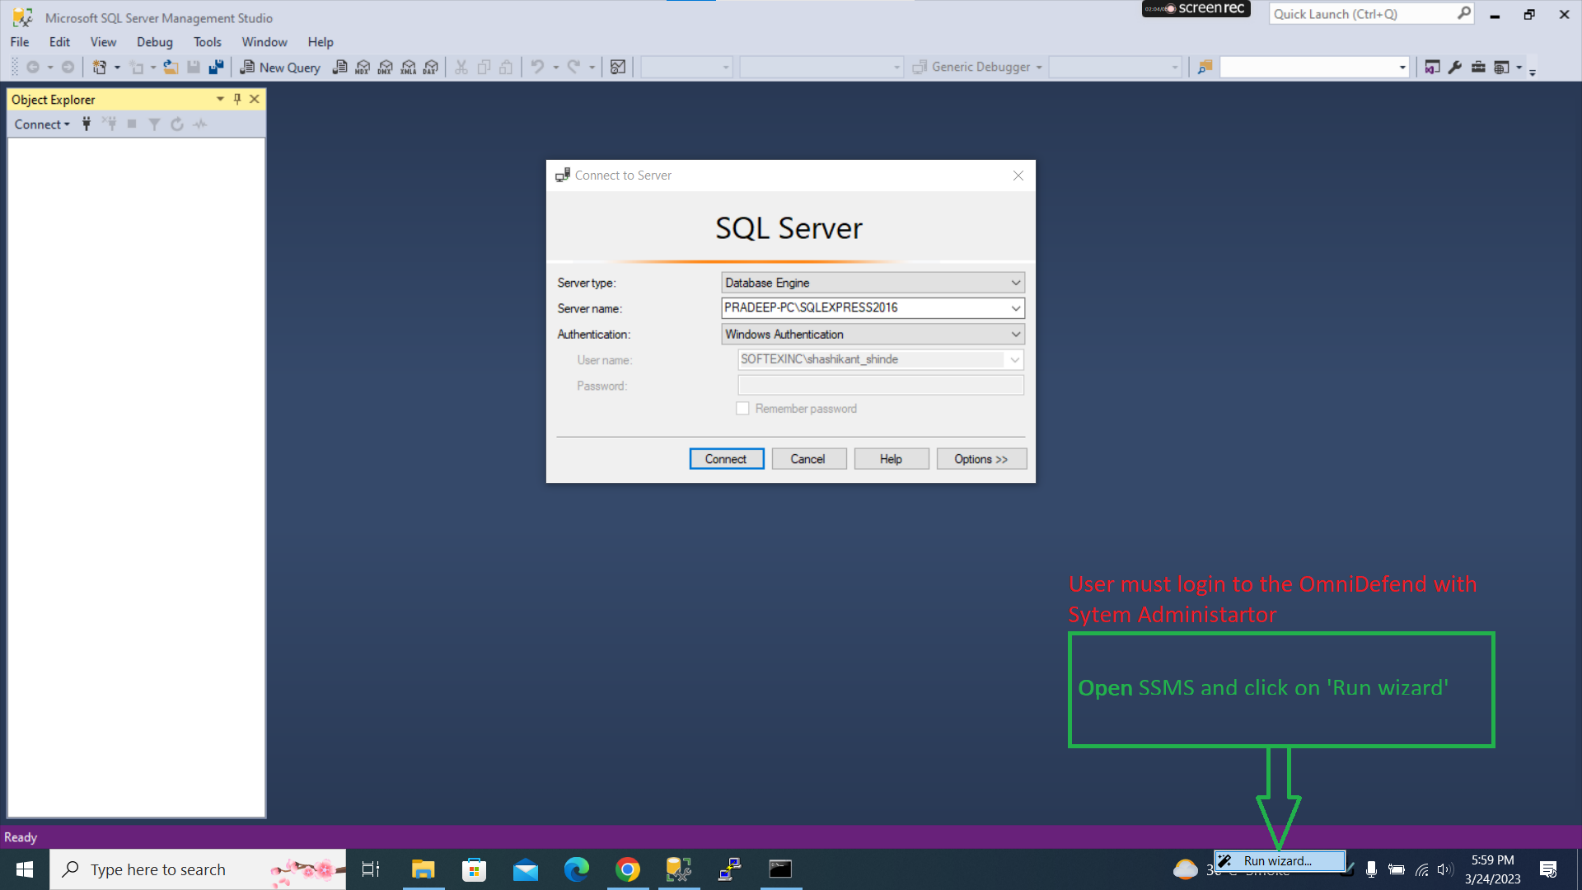
4. Drag and Drop the Icon in the Password Wizard
After clicking
Run Wizard, thePassword Wizard for Desktop Applicationswill open. Locate and clear the data from theServer Namefield in the wizard, and as you can see in the image below, drag and drop the icon onto the relevant field in the desktop application.
5. Repeat Drag and Drop for the ``Authentication`` Field
We will repeat this process for the
Authenticationfield in the wizard. First, selectWindows Authenticationwithin the relevant field in the application. Next, as seen in the image below, drag and drop the OmniDefend icon into the field.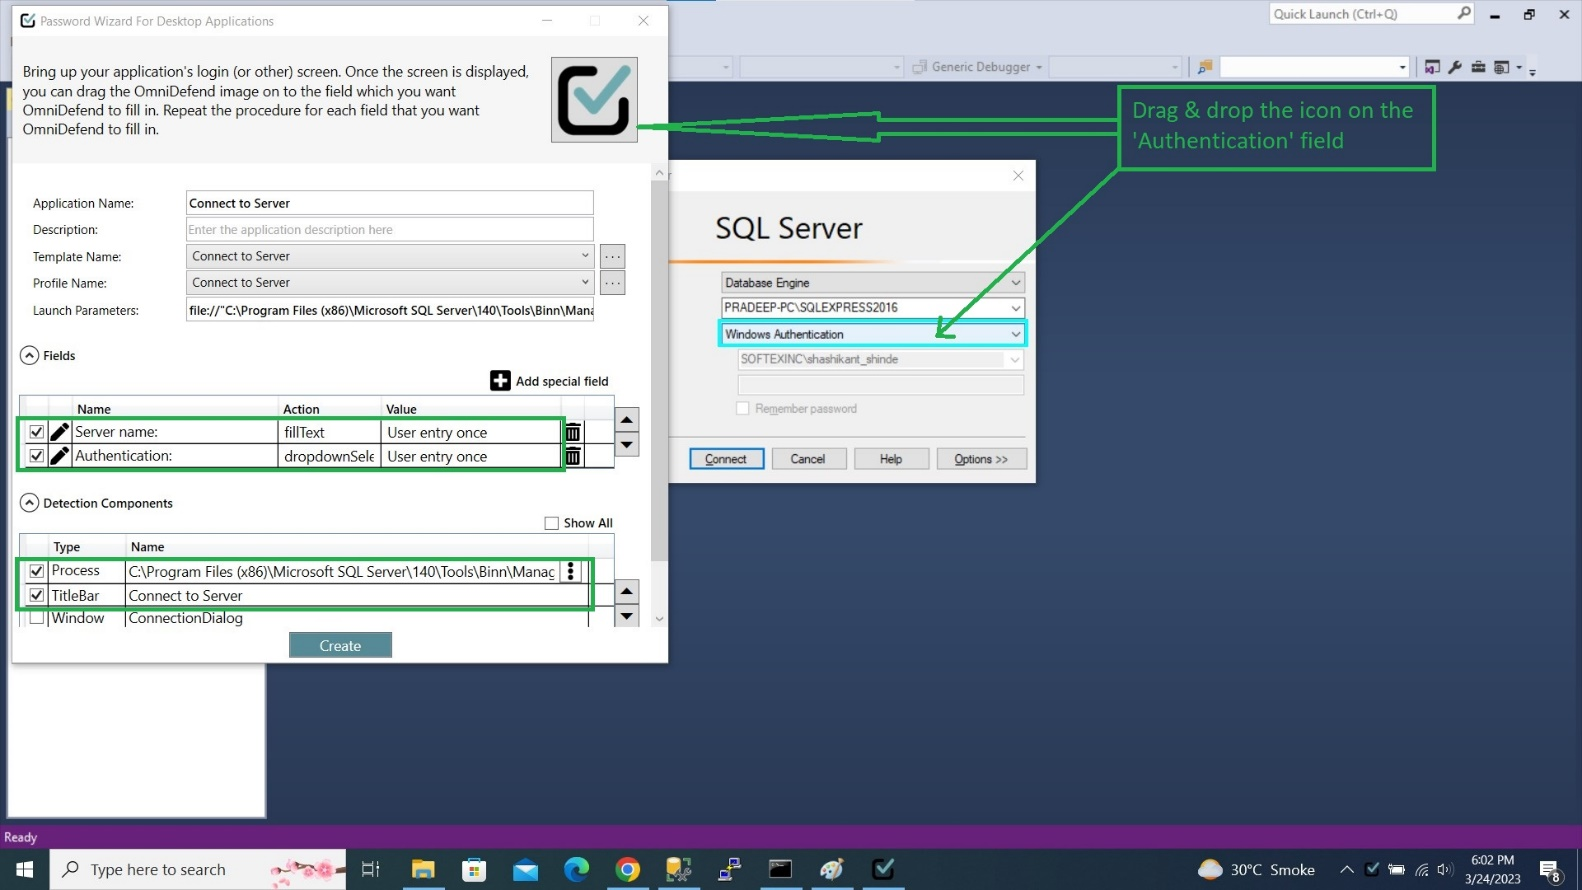
6. Repeat Drag and Drop for the ``Connect`` Button
We will repeat this process for
Connectbutton in the application. For clarity, see the image below: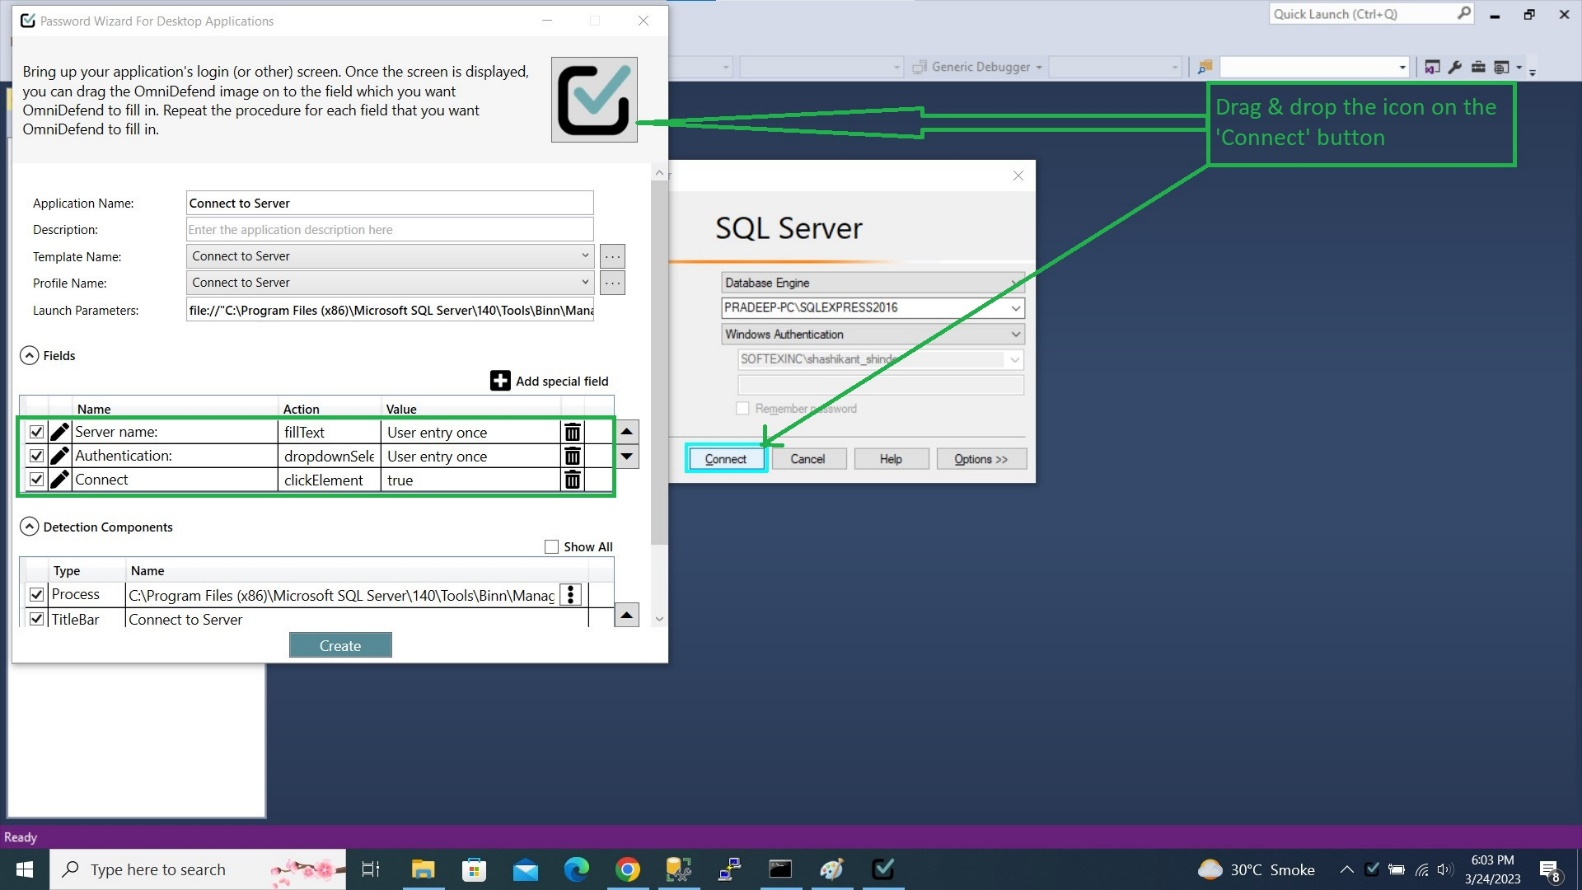
7. Deselect ``Password`` field in the Password Wizard
Navigate to the bottom of the
Detection Componentssection of the Password Wizard. Uncheck the box for thepasswordfield, as seen in the image below: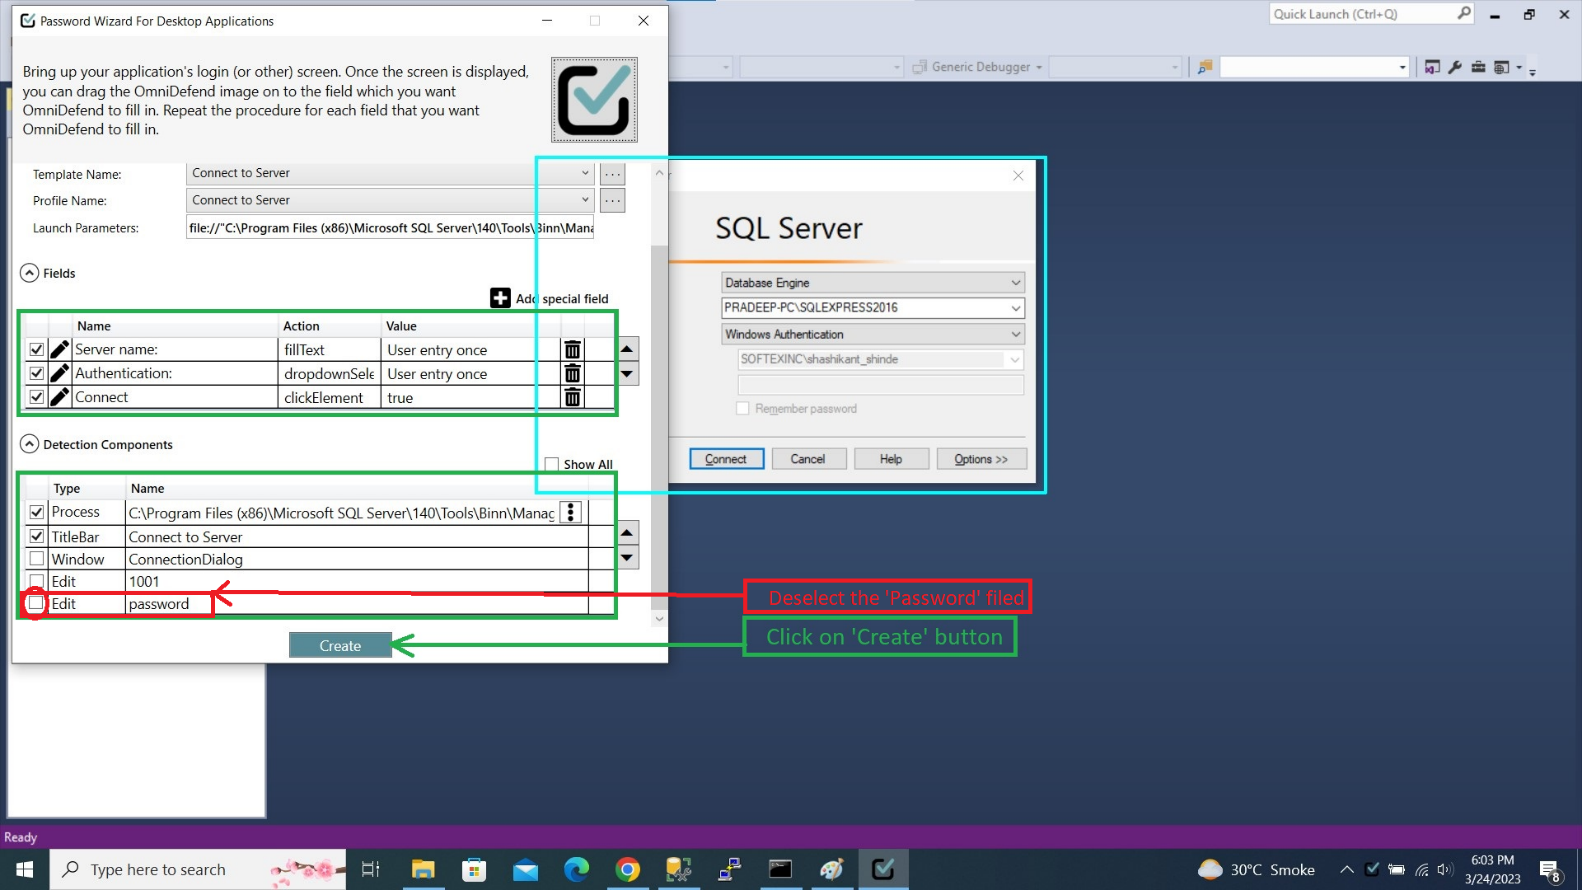
Left-click the
Createbutton in the Password Wizard. As seen in the image below, a confirmation box will be presented.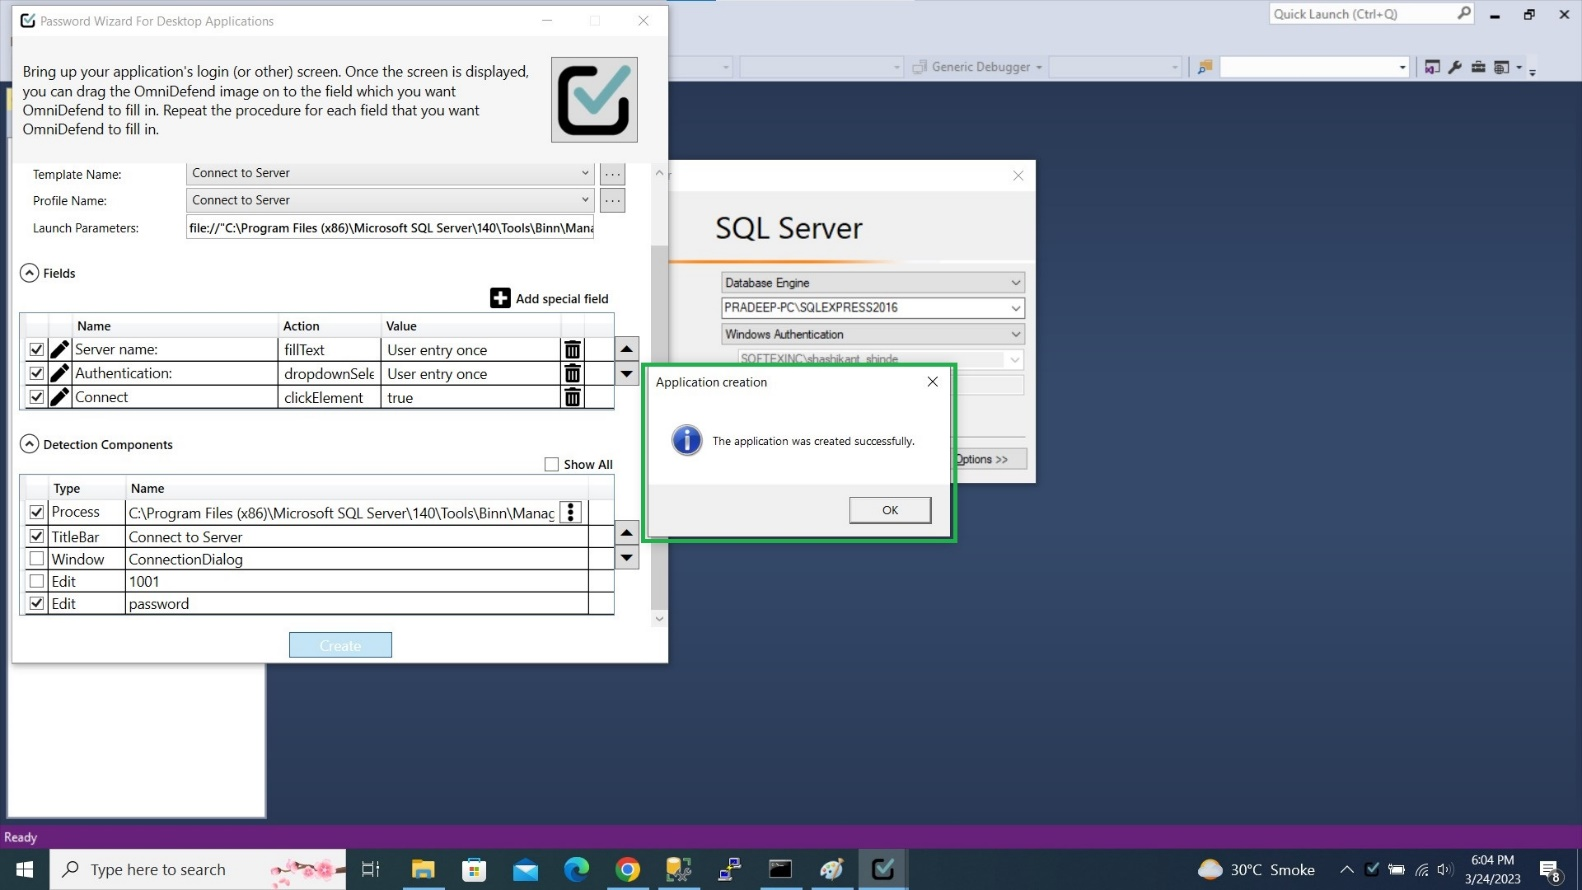
8. Prompt the OmniDefend Authentication Pop-Up
Once the password wizard closes, click anywhere in the background of the dialog box of the application. The OmniDefend Pop-Up will appear and prompt for authentication, as seen in the image below:

Finish by logging into OmniDefend using the popup and the pre-provisioned MFA credentials.
Browser-Based Applications
This set of instructions will demonstrate how to provision OmniDefend password-fill SSO onto a browser-based application.
1. Login to OmniDefend
Login to the OmniDefend Portal as an admin. After doing so, navigate to the browser application which you want to provision. For this documentation, we will use the example of imgur.com
Caution
Before proceeding further, ensure that you are logged in to the OmniDefend extension agent as the same user by clicking on the SSO extension in the browser toolbar.

2. Navigate to Application Login Page
Navigate to the Sign In page of the browser application. The OmniDefend
Save Credentials?popup will automatically appear and prompt for SSO setup, as seen in the image below: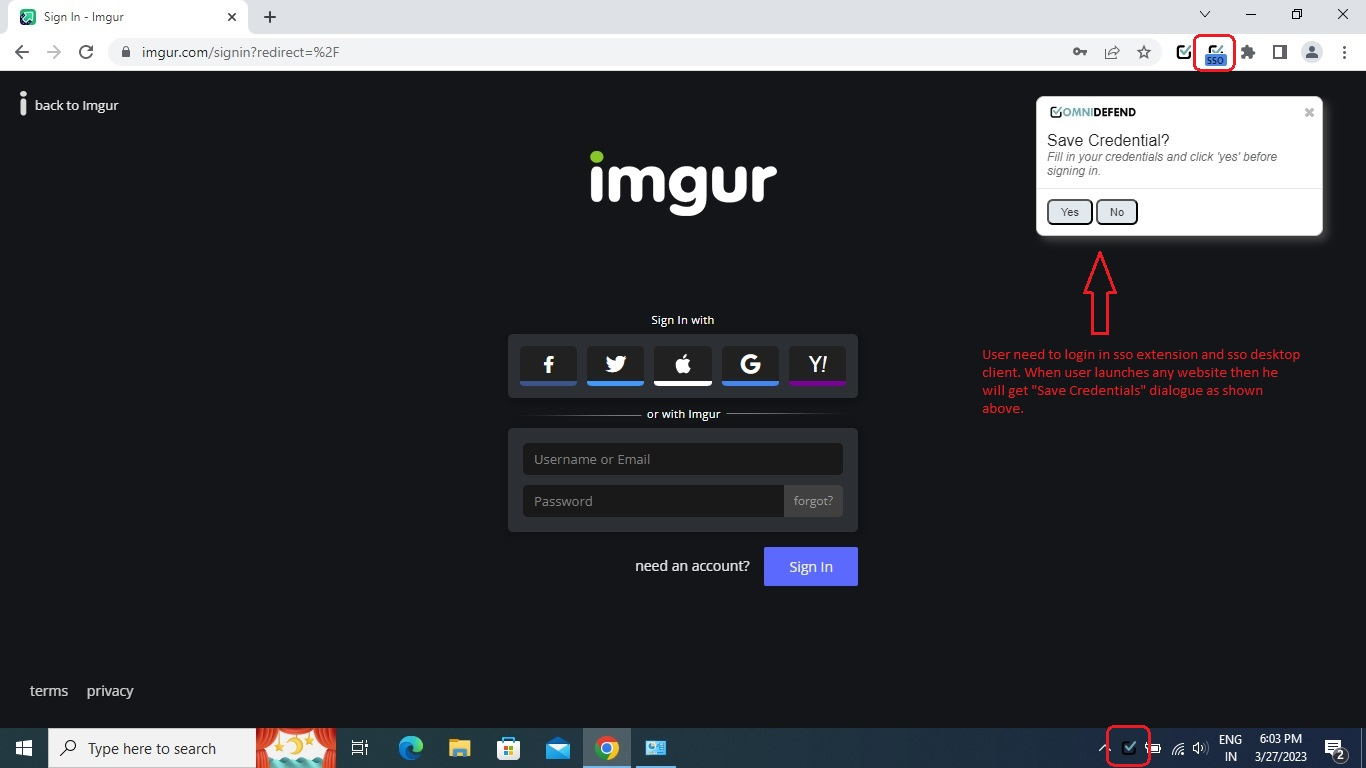
3. Enter credentials BEFORE clicking ``Yes``
Ensure to enter in the credentials to the username and password boxes BEFORE clicking
Yesin theSave Credentials?box and BEFORE confirming sign in into the application.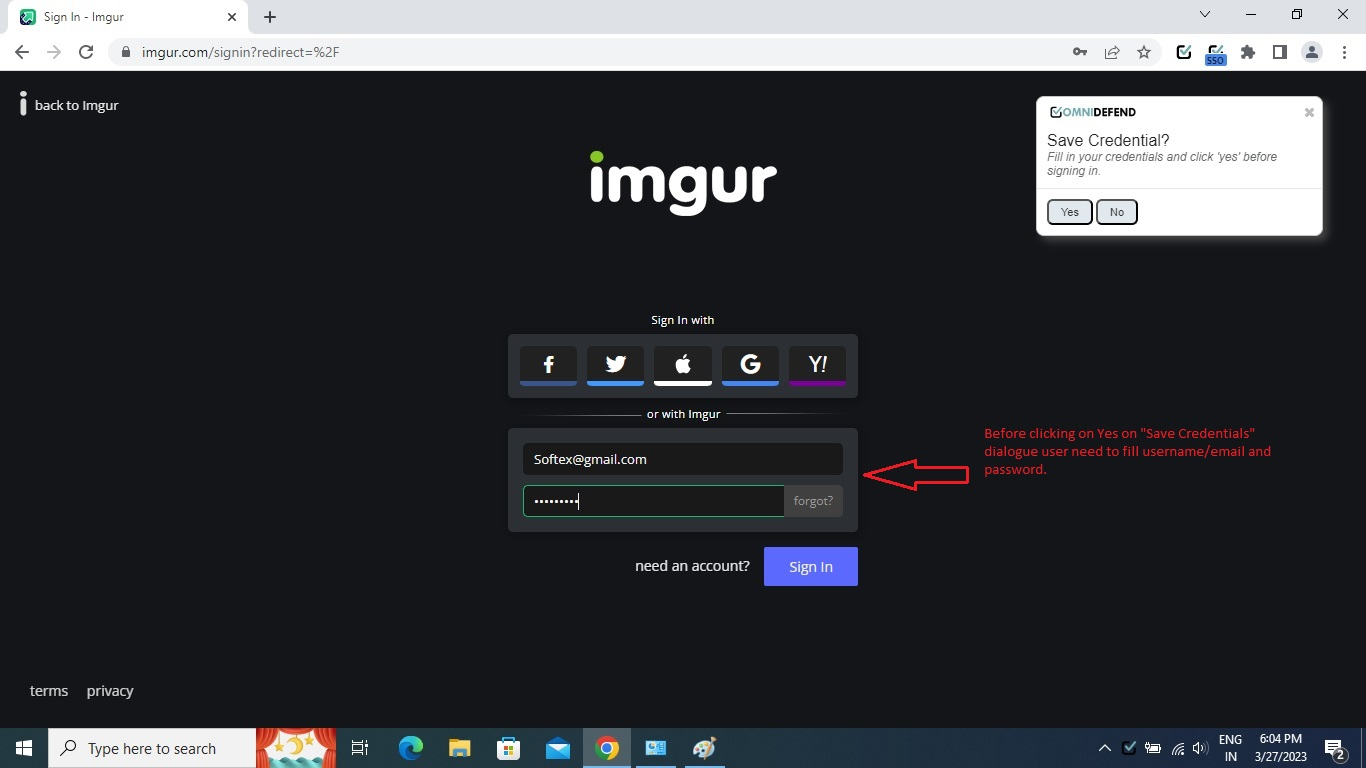
4. Navigate to the Portal Launch Wizard
Log out and then log back into the OmniDefend portal. Navigate to
Applicationsand select the relevant application (in this case Imgur). Left-clickActionsand again onLaunch Wizard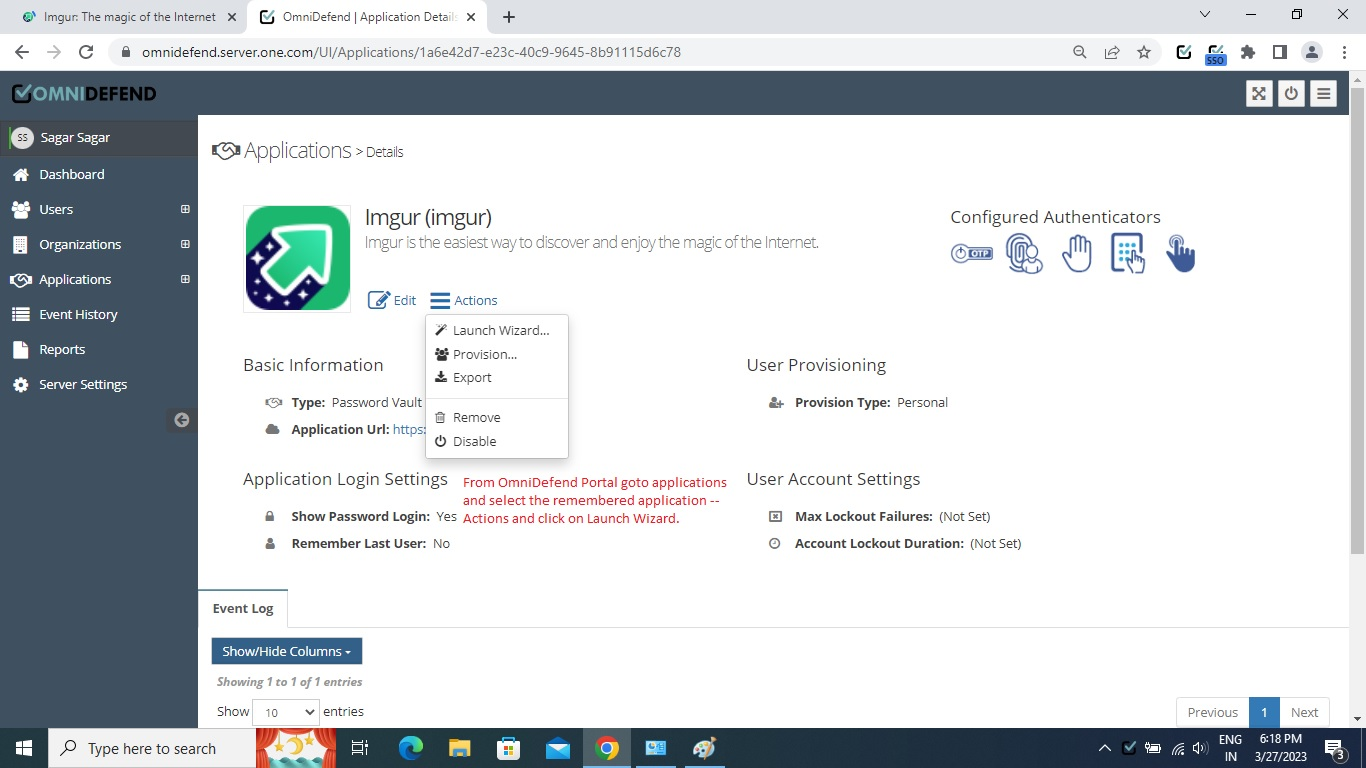
Tip
The SSO wizard on the portal allows you to edit the
Vault Templatesas well as configure different SSO features such as disabled username and password fields or random password generation.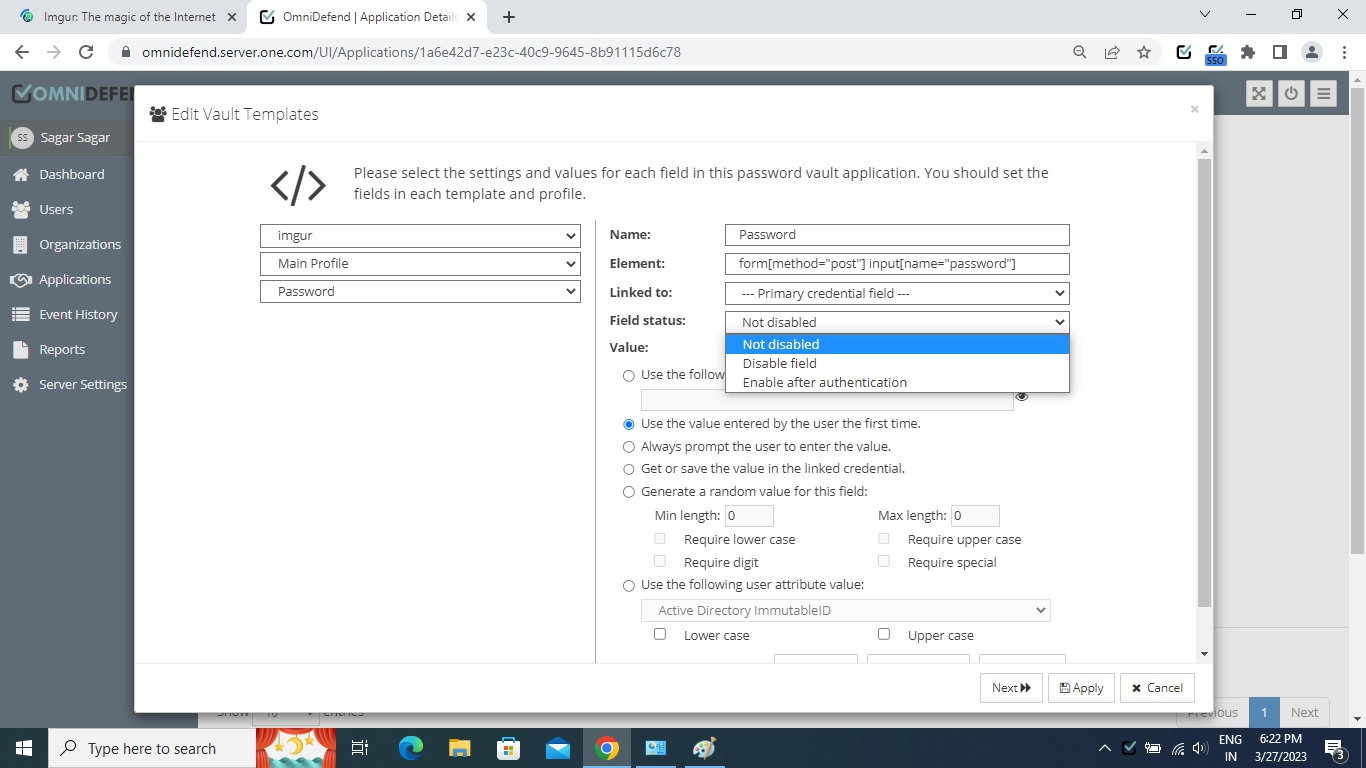
5. Provision the application through the Portal
Navigate to
Applicationsand select the relevant application (in this case Imgur). Left-clickActionsand again onProvision...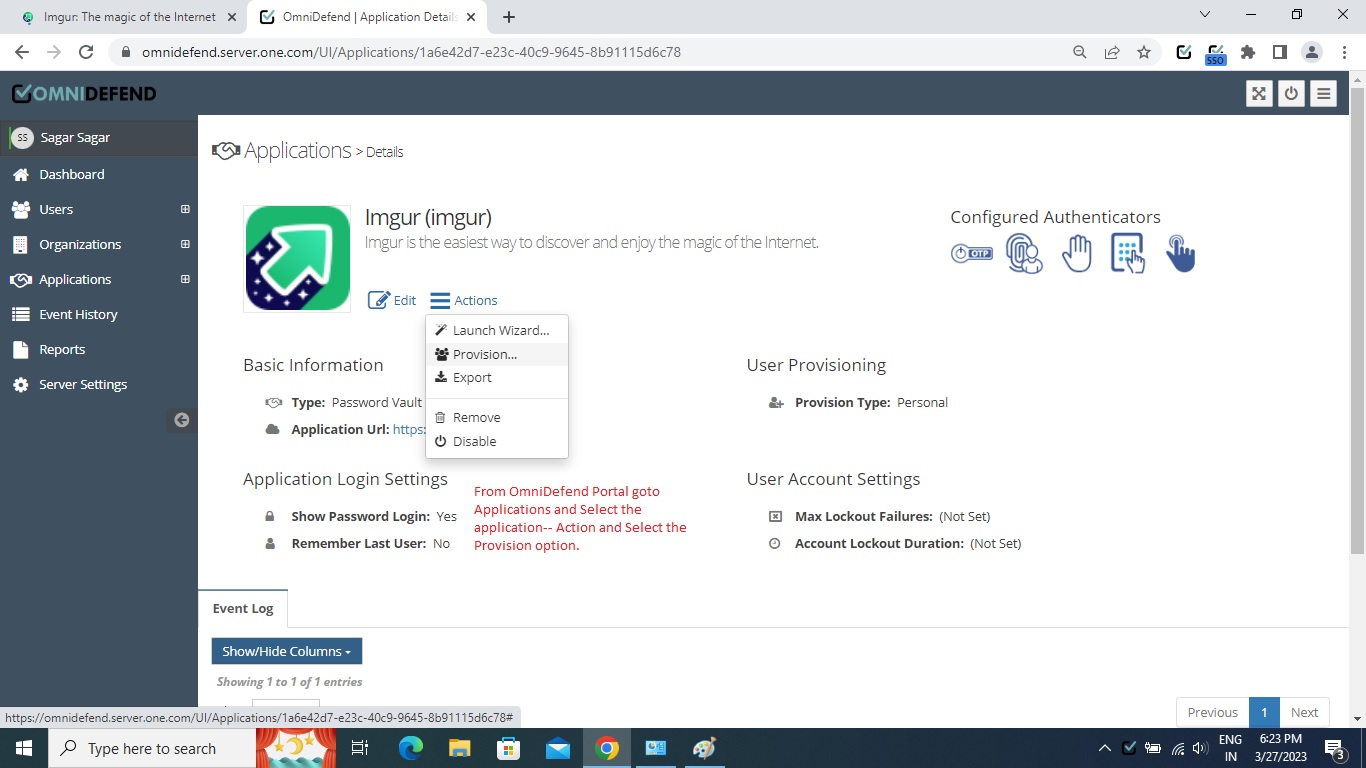
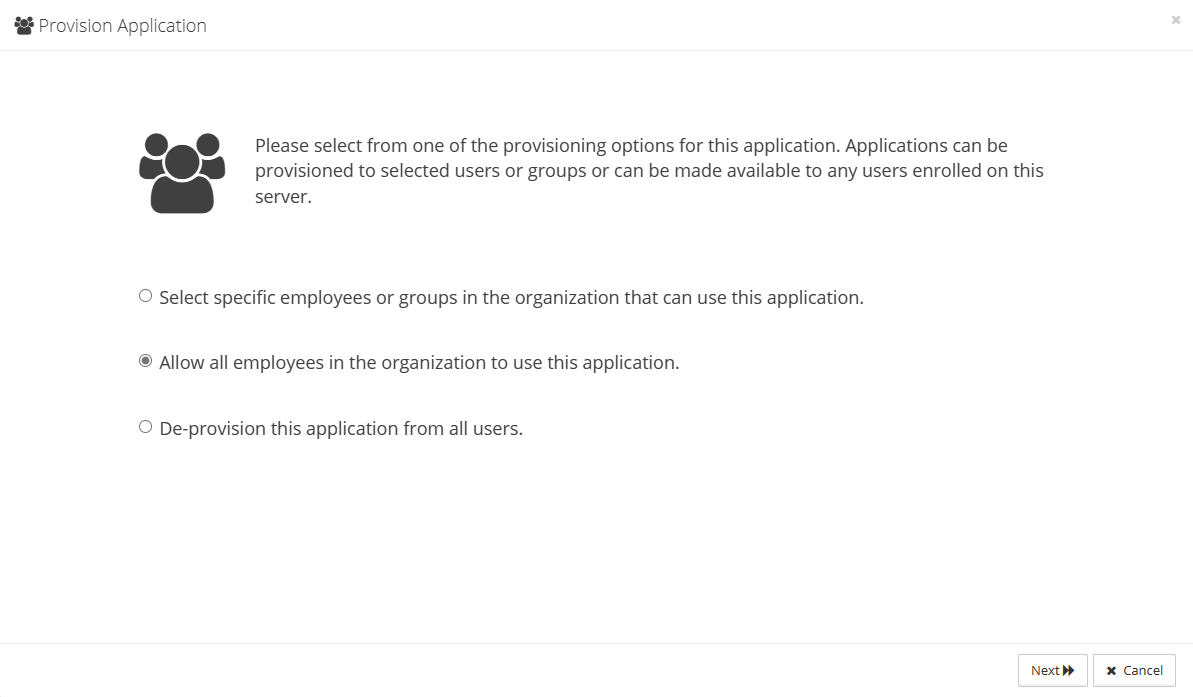
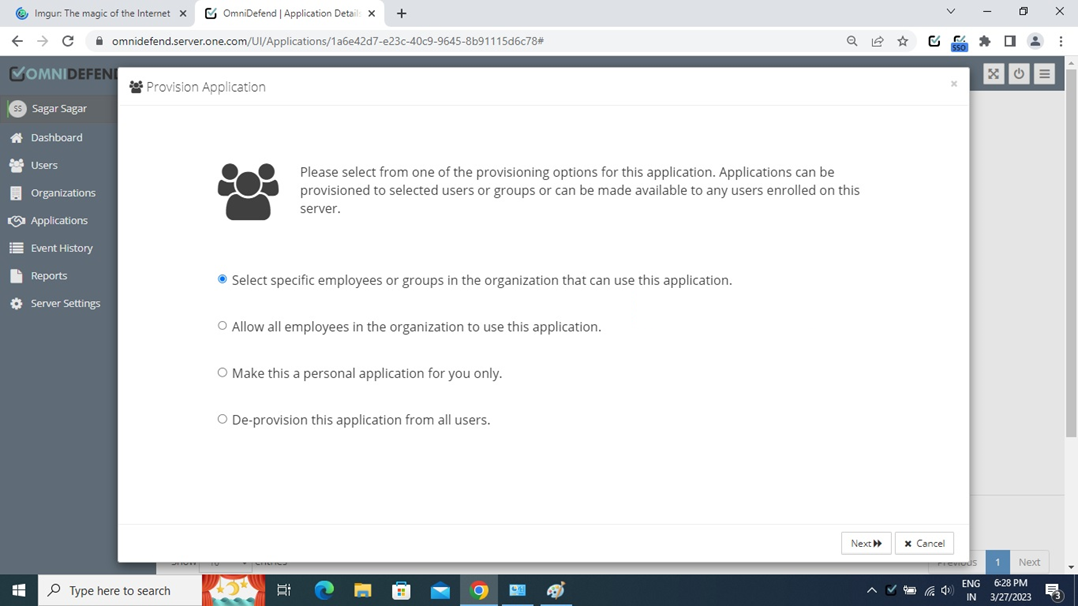
To finish, select from one of the provisioning options for the application. The four options will appear the same as the image below:
Windows Login with Credential Provider
This set of instructions will demonstrate how to create a Windows Login application within OmniDefend and provision it to users accordingly.
1. Satisfy Prerequisites
There are several prerequisites that are required to be satisfied prior to Windows Login application setup.
Ensure that the OmniDefend Credential Provider Client has been installed through either .exe or .msi files. For more info on where to find these files, please contact info@softexinc.com <info@softexinc.com>_
Ensure that the provided registry files are edited and updated correctly.
Note
OmniDefend Credential Provider requires OmniDefend Server Information to connect. Please edit provided registry files
OmniDefend_CredProv_Setting.regand update theServerUrl,ClientIdandClientSecretvalues in registry files. Please install updated registry files on the client systems. You can push this reg file to the respective user’s machine via group policy.2. Create a Windows Login application in the OD Portal
To enable OmniDefend Credential Provider, we must first create an application within the OmniDefend platform. Follow these steps to create the application for the Credential Provider, named
WinLogon:
Login to the OmniDefend portal and navigate to
Applications>Add Applications(s)Select the application type as
Windows Loginfrom the dropdown, as shown in the image below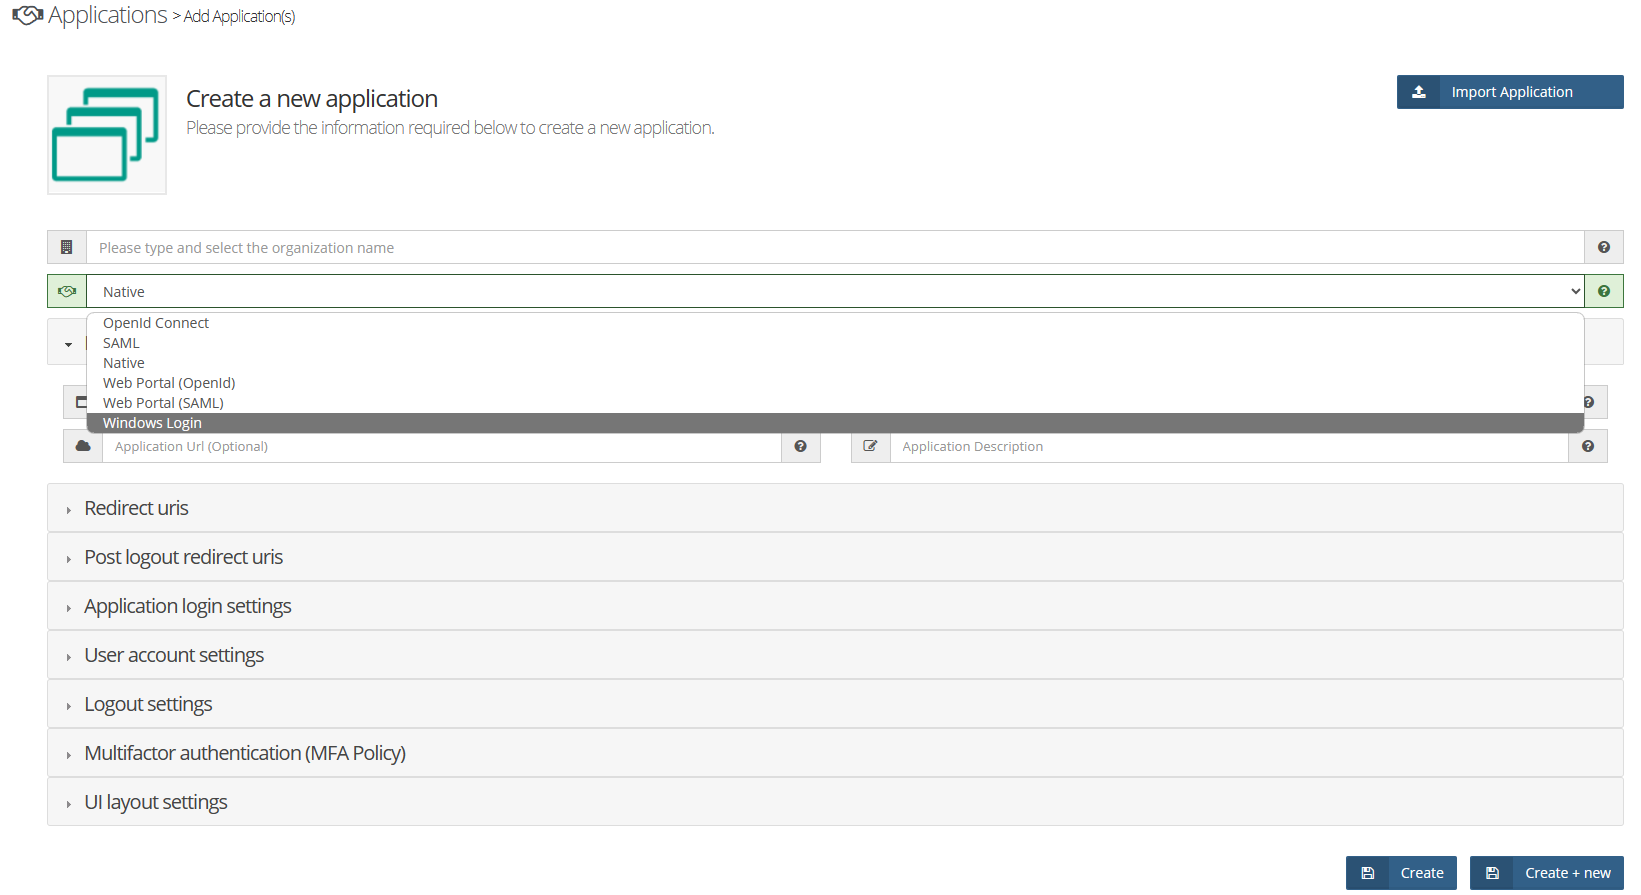
Provide the necessary basic application information, including name, short name, and description. Optionally, update the ‘User Account Settings’ to configure the account lockout feature for failed attempts, adjust the ‘Desktop Login Settings’ as needed, and/or adjust the ‘MFA Policy’ for this application.
Click
Createto generate the application3. Provision the Windows Login application
Navigate to
Applications>Windows Login. Select the relevant Windows Login applicatoin and Left-clickActionsand again onProvision...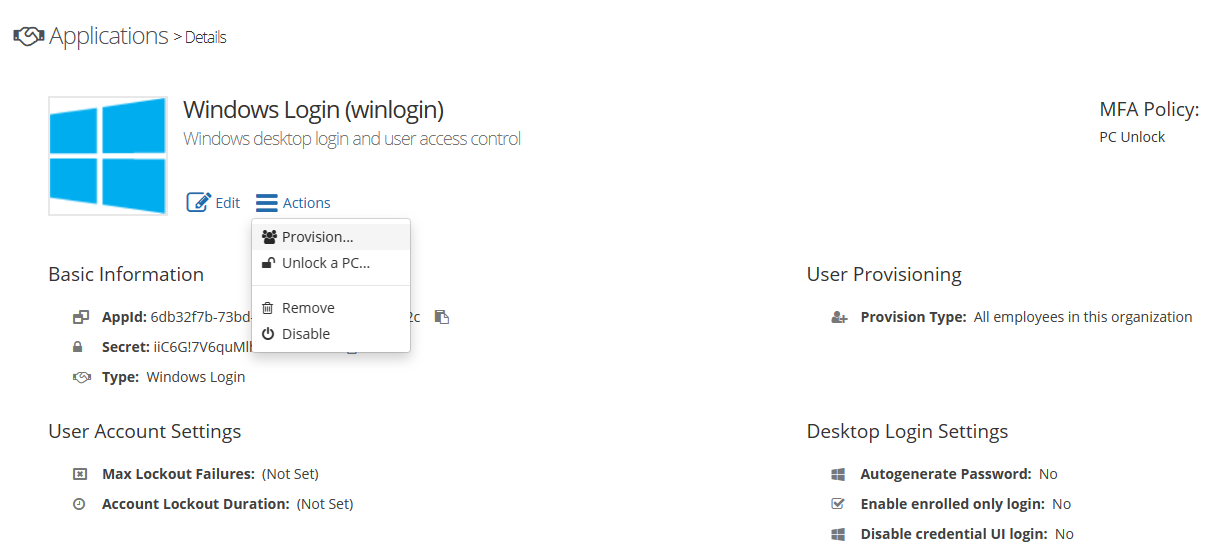
To finish, select from one of the provisioning options for the application. The four options will appear the same as the image below: