Setting Up The Server
A Brief Overview
OmniDefend is a single server that implements these identity, authorization and authentication specifications. This allows for a variety of client applications (such as mobile apps, web apps, desktop apps, embedded apps, etc) to take advantage of user authorization and authentication based on a single common database of users enrolled into the OmniDefend server.
OmniDefend also consists of a front-end application that provides that provides the web-based user and administration interfaces that can be used to manage and use the identity and access management features of OmniDefend
To visualize the OmniDefend server and front-end UI interaction, see the diagram below:

5 Steps to Server Setup:
1. Server Requirements
Hardware Requirements
Processor: 2.0 GHz and 4 cores or faster
Memory: 16GB or more
Hard-disk Space: 256 GB or more
Note
These hardware requirements are set to utilize a minimum set of computing and human resources to incur minimal cost to your organization. The server requirements listed are ideal for 100-200 users and should be adjusted depending on the actual production environment.
The client PCs should also have the desired authentication modality hardware installed (e.g., fingerprint/palm vein scanners/facial recog. etc.) with the appropriate drivers.
2. Preparing Your Server
a. Software Requirements
Windows Server 2019/2016 with IIS role installed. The following features need to be installed as part of the IIS installation:
Common HTTP Features - Default Document, Directory, HTTP Errors, Web-Http-Errors, Static Content, HTTP Redirection
Health and Diagnostics - HTTP Logging, Custom Logging, Logging Tools, Request Monitor, Tracing
Performance - Static Content Compression, Dynamic Content Compression
Security - Request Filtering, Basic Authentication, Centralized SSL Certificate Support, Digest Authentication, IIS Client Certificate Mapping Authentication, URL Authorization, Windows Authentication
Application Development - .NET Extensibility 3.5, .NET Extensibility 4.x, Application Initialization, ASP.NET 3.5, ASP.NET 4.x, ISAPI Extensions, ISAPI Filters, Server Side Includes, WebSocket Protocol
Management Tools - IIS Management Console, IIS 6 Management Compatibility, IIS Management Scripts and Tools, Management
Tip
Install IIS URL Rewrite extension here: (https://www.iis.net/downloads/microsoft/url-rewrite)
Tip
Install .net framework 4.8 on the Windows Server. Scan Windows Update, and then install the latest .NET Framework updates after you install .NET Framework 4.8.
Microsoft SQL Server 2014
Note
this can be running on another Database server. In addition, a Microsoft SQL Express server can also be installed if needed.
Identify the OmniDefend base URL and portal URL you would like to use for the server. Recommended URLs should be something like
https://iam.<companydomain>.comandhttps://sso.<companydomain>.com.The first URL is typically used for server management, and the 2nd URL is used by users to access their dashboard, etc. The DNS server should resolve selected URLs to IIS server. You will require a wildcard certificate forhttps://*.<companydomain>.comto install on the server. If the ‘wildcard’ SSL certificate is not available, then a single URL can be used for server management and user dashboard, and you should provide a specific SSL certificate for the single URL.Caution
You will need an SSL certificate. This can be acquired from a third-party company or generated as a self-signed SSL certificate in our server installer.
Download the following 3rd party components onto the server:
NVIDIA CUDA Library – this is used for the OmniDefend fingerprint matcher.
Tip
Download from https://developer.nvidia.com/compute/cuda/8.0/Prod2/local_installers/cuda_8.0.61_win10-exe
NVIDIA CUDA Library service patch
Tip
Download from https://developer.nvidia.com/compute/cuda/8.0/Prod2/patches/2/cuda_8.0.61.2_windows-exe
Windows 10 is required. Professional edition (joined to the Active Directory) is recommended. Chrome, Firefox, or Edge browsers are acceptable.
b. Additional Requirements
A non-personal privileged account with email access is required for OmniDefend super user.
An SMTP Server address and credentials. The SMTP server is used by the OmniDefend to send out emails to users for various functions. For example, if a user needs to reset his Active Directory password through OmniDefend’s self-service feature, the SMTP server will be used by OmniDefend to send the user a link he can click to reset his password.
Active Directory server address and service account. Users will be imported from the organization’s Active Directory. This will link the user’s authentication information, SSO policies, etc in OmniDefend to the user’s Active Directory account. On the Active Directory service account, please perform the following tasks:
Please select the OU(s) where all the users reside and delegate following tasks to service account:
Reset user passwords and force password change at next logon
Read all user information
Reset inetOrgPerson passwords and force password change at next logon
Read all inetOrgPerson information
- Please also create a custom task to delegate using the following steps:
Select Only following objects in the folder and check User objects (Click Next)
Select General & Property-specific options and select read, read lockout time, write lockout time (Click Next)
The following security groups need to be created in Active Directory for role management:
Required Roles
OmniDefend_SystemAdministrator
OmniDefend_CompanyAdministrator
OmniDefend_Auditor
OmniDefend_EnrollerOptional Roles
OmniDefend_HelpDeskAdministrator
OmniDefend_LocalAdministrator
OmniDefend_BranchAdministrator
OmniDefend_Operator
OmniDefend_BranchOperatorTip
You should identify users that will have special roles and add those users to the appropriate security group in Active Directory.
c. Checking file structure for certificates
Navigate to
C:\TempIf
C:\Tempdoes not exist then create a new folder named TempCreate a folder inside Temp named
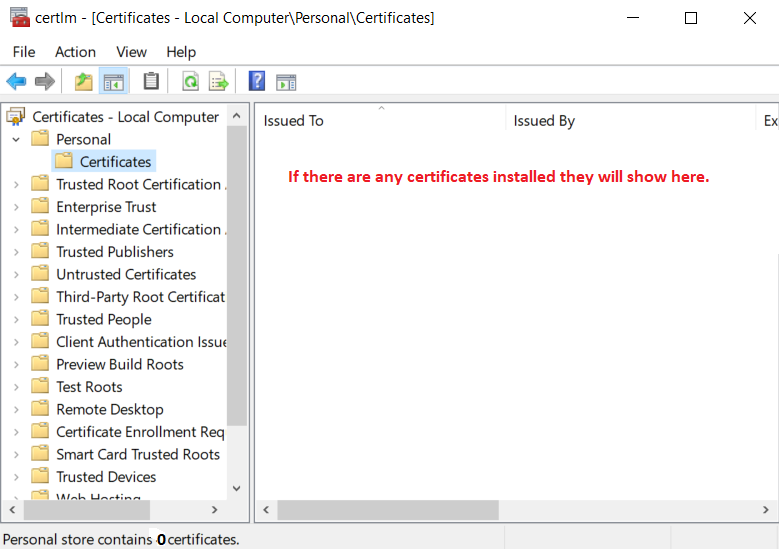
ODCertificatesd. Checking for pre-existing certificates
Windows search
Certlm.mscNavigate to Personal and click the certificate folder underneath.
3. Installing Your Server
a. Starting the installation of the OD server
The purpose of this section is to ensure the OD Server is installed correctly.
Run command prompt (
cmd) as an administrator.Navigate to the directory of the install folder (see image below for clarification).
Type
OmniDefendServer.msiand hit Enter.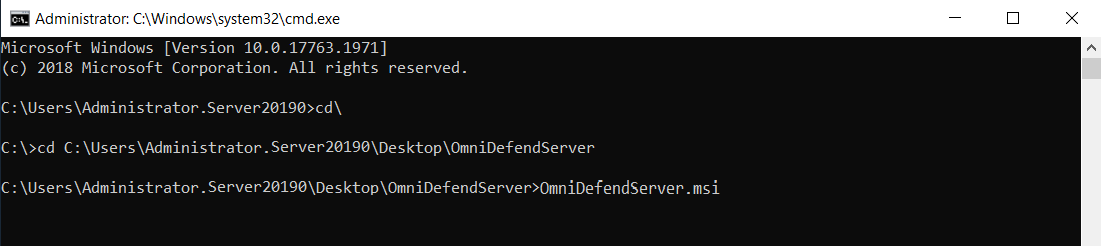
The next section will walk through the installation wizard.
b. The OmniDefend server installation wizard
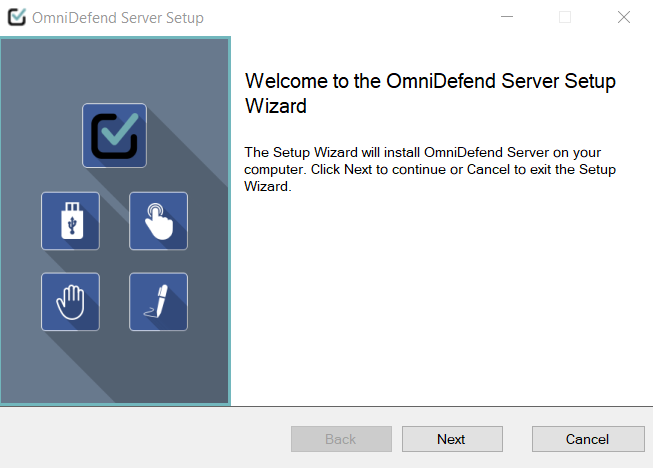
To get started with the installation wizard, you should see the screen below:
Click the next button and agree to the user license agreement to specify website settings. You should see an image like this:
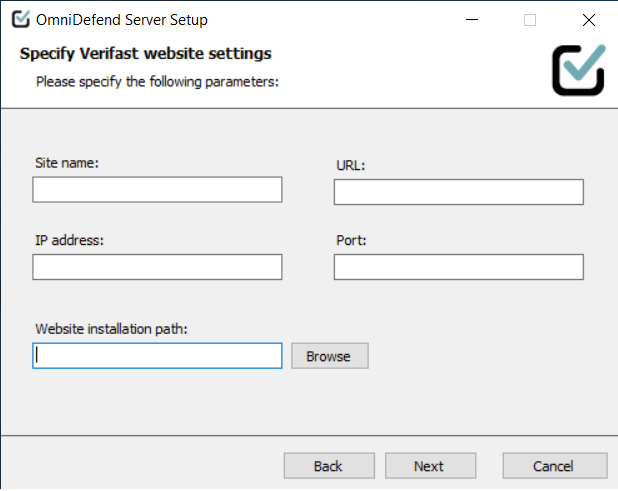
Note
Port will not allow a value of 0, so specify an SSL port
Website installation path is prefilled. We strongly recommend you use this directory for the OmniDefend installation.
The installer will now run. The next section will cover adding the SSL Certificate.
c. Preparing the SSL and token-sign Certificate for your website.
There are three different ways you can setup the SSL Certificate for your website.
Select from pre-installed certificate - if you have a certificate installed, select it from the dropdown. Otherwise leave this blank.
Import certificate from a (.pfx) file - if you have a certificate, choose this option.
Create a self-signed wildcard certificate - choosing this option will create your own certificate for OmniDefend. If you need more info about this please email ayush_bhansali@softexinc.com and request the wildcard SSL certificate guide.
Next, setup the token-sign certificate. Once again, there are three ways to do this. See the image below for clarity.
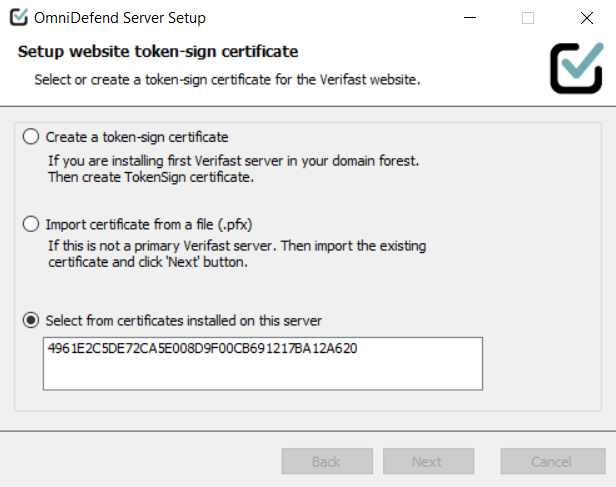
Create a token-sign certificate - Choose this option if this is the first OmniDefend server being installed.
Import Certificate from a (.pfx) file - If you have a certificate, choose this option.
Select from a pre-installed certificate - if you have a certificate installed, select it from the dropdown. Otherwise leave this blank.
You should now be able to finish the installer wizard. The next section will walk you through the setup wizard and server configuration.
4. Configuring Your Server
a. Getting started with the setup wizard
To launch the setup wizard, open the browser. You are ready to continue with the setup wizard when you see the screen below:
Tip
If you need to navigate to an unfinished server, launch the browser and it should automatically launch the same page.
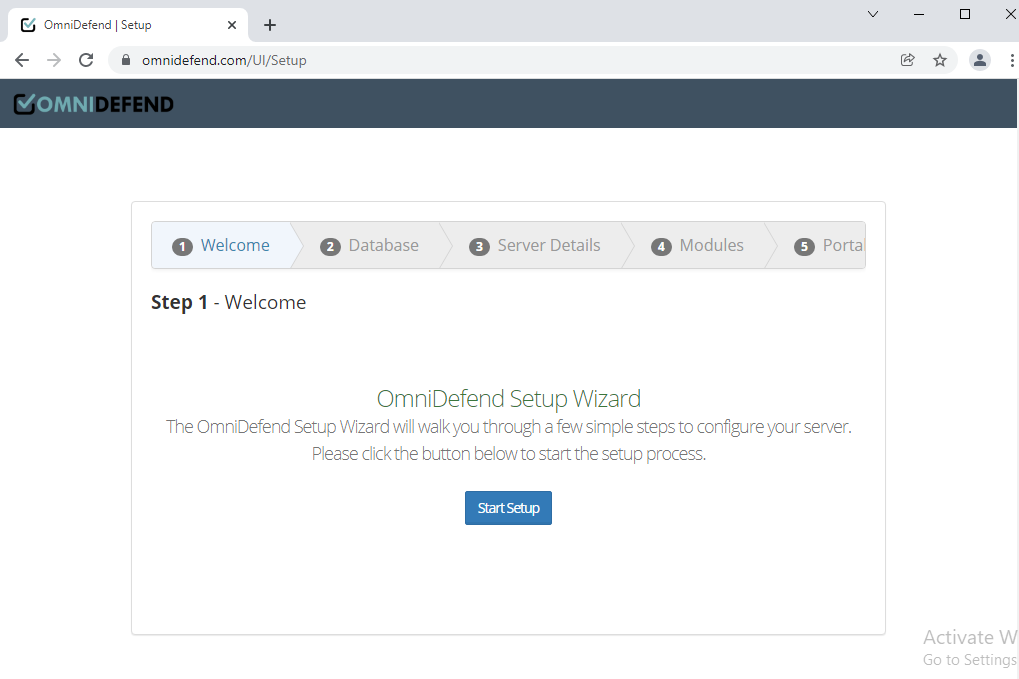
To start the server setup, press
Start Setupb. Database Setup
Fill in the fields on the
Step 2 - Database Setuppage as shown below.Caution
Database Namecannot include any spaces.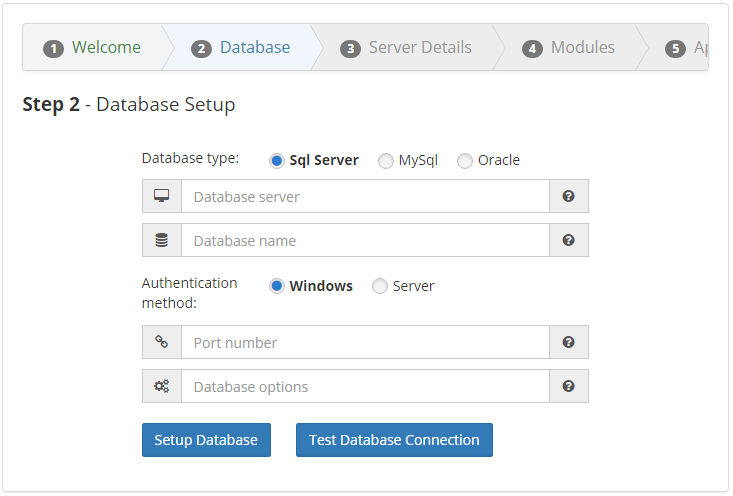
Select
Serveras the authentication method. Upon doing so, 2 more fields appear forUsernmaeandPassword.Note
The
Port NumberandDatabase Optionsfields should be left blank.Upon succesfully entering in the credentials and clicking
Test Database Connection, the following message will appear: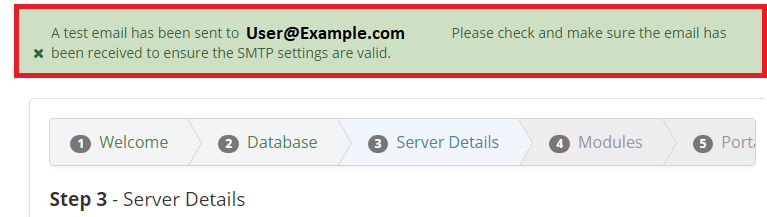
To finalize the database setup, click
Setup Database. The next portion will cover server settings.Caution
Make sure you are ready to proceed before clicking the
Setup Databasebutton. Unlike other pages with the back button, this cannot be changed later,
5. Managing Server Settings
a. Server Details
The Server Details page is divded into three parts, see the image below for clarity. Once you have filled out all three parts, click the
Create Serverbutton at the bottom, and as long as the information is entered correctly, the server will be created succesfully.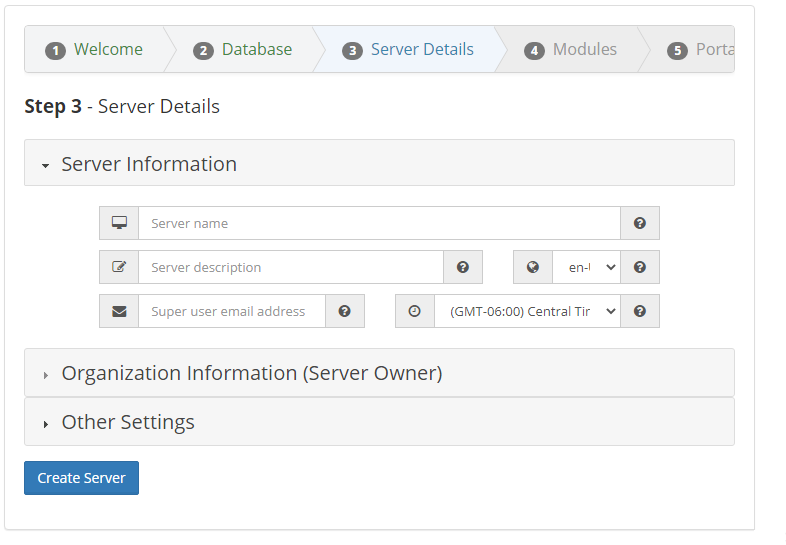
Part 1 - Server Information
Set a name for the server. For example,
OD Test Server.Set a brief server descripton. For example
2012 R2 X65bit.Set the correct language locale for the server. By default
Enfor English is selected.Set the email address for the Super User. For example
test@softexinc.comSet the correct timezone for the server. By default,
(GMT-06:00) Central Time (US & Candada)is shown.Part 2 - Organization Information (Server Owner)
Set the company name.
Set the No-Reply email address.
Tip
The No-Reply email address is used for bounce back emails and should be different from the Super User’s email.
Set the No-Reply users name.
Set the SMTP Hosts name.
Set the SMTP Port number.
Set the SMTP Username.
Type in the SMTP Password.
If your SMTP server uses SSL encryption, check the appropriate box.
Part 3 - Other Settings
To set Captcha, enter in the
Captcha site keyand theCaptcha secretb. Authentication Modules
This section covers adding authentication modules to the server which will cater to your specific needs. The screen below shows a list of currently available authentication modules with corresponding slider bars to enable or disable each module. See the image below for clarity:
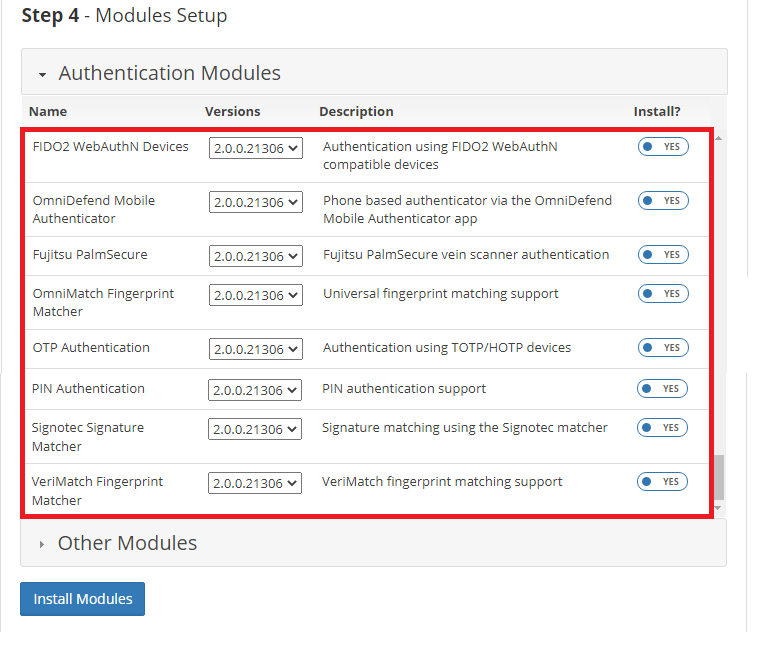
Tip
Add as many or as few authentication modules as you want, you can choose later to provision or de-provision them to users as per your needs.
Next, in the section titled Other Modules, add other modules such as the Active Directory connector or Windows Credential Provider. When you’re ready press the
Install Modulesbutton to finalize changes.c. Default Portal Setup
This section covers the setup process for the default portal settings. This page is divided into 3 parts, which you can see in the image below.

Part 1 - Portal Settings
Set a value for
Max Login Timein minutes.Note
Max Login Timeshould not be confused withInactivityin the next section.
Set a value for
Inactivity Timein minutes.Caution
For security purposes, it is strongly recommended to assign a low value to
Inactivity Time.
Enable or disable the feature which forces a lockout upon multiple login failures. If you choose to enable, you should also set the value for login attempts before lockout and lockout duration.
Enable or disable the feature which remembers last username upon logout of the server.
Enable or disable the feature which allows user registration at the portal login screen.
Enable or disable the feature which presents a
Remember Metick box at portal login.Part 2 - Authenticators
Enable or disable multi-factor authentication methods as per your needs.
Tip
Select authentication methods which are disabled by default such as
Azure AD,Savebutton after entering the credentials.Part 3 - UI Layout Settings
If you wish to add a Favicon URL, enter it in the corresponding box.
Having completed the default portal setup, click the blue button labeled
Confiugure Portalto proceed.