User Management
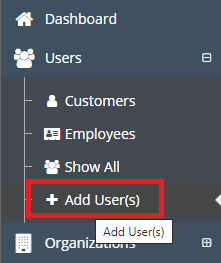
The purpose of this section is to understand the OmniDefend User Management Feature. All user management features can be located by clicking Users in the lefthand pane on the OmniDefend dashboard. See the image below for clarity.
Adding/Removing Users and Editing User Information
1. Adding a User
To add a user, locate the lefthand pane in the OmniDefend Dashboard, and under
Users, clickAdd User(s). You should see a page titledCreate a New User, as seen in the screenshot below.
Fill out all of the fields above.
Tip
The following fields are optional:
Office BranchandBranch CodeThe
user rolefield is significant to the access management level of the user. Choose a role from the available list, as depicted in the image below.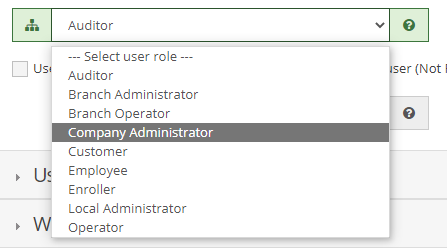
Each role has things the user can and can’t do. For more information on
user roleprivileges, see the table below.
OmniDefend Roles Role display name
System Administrator
HelpDesk Administrator
Company Administrator
Local Administrator
Branch Administrator
Operator
Branch Operator
Auditor
Enroller
Employee
Customer
Role internal name
SystemAdministrator
HelpDeskAdministrator
CompanyAdministrator
LocalAdministrator
BranchAdministrator
Operator
BranchOperator
Auditor
Enroller
Employee
CustomerRole description
The system administrator role
allows access to all functions
in OmniDefend in all
organizations in the server.
The helpdesk administrator role
allows access to all
non-server related functions
in any organization.
The company administrator
role allows access to
all functions in OmniDefend
that are accessible
to their organization.
The local administrator role
allows access to all
functions in their organization
except for configuration of
organization specific settings.
The branch administrator role
allows access to all user
administration and auditing
information in their work
branch in their organization.
The operator role allows for user administration (except enrollment) in his/her organization.
The operator role allows for user administration (except enrollment) in his/her work branch in his/her organization.
The auditor role allows access to reporting and auditing functions in OmniDefend for his/her organization.
The enroller role allows a user to create and enroll other users in his/her organization.
The employee role allows access to the user’s portal and employee related functions like single-sign on (SSO) and Windows login.
The customer role is assigned to users that only require authentication and identity management services. The user can not login to the OmniDefend server and has no access to services like single-sign on (SSO) or Windows login.
User permissions
omnidefend:permissions:core:users:createUsersAll Organizations
AllOrganizations
Same Organization
Same Organization
Same Work Branch
Same Organization
Same Work Branch
Same Organization
omnidefend:permissions:core:users:viewUsersAll Organizations
AllOrganizations
Same Organization
Same Organization
Same Work Branch
Same Organization
Same Work Branch
Same Organization
Same Organization
Self
Self
omnidefend:permissions:core:users:viewUsers:resetPwdAll Organizations
AllOrganizations
Same Organization
Same Organization
Same Work Branch
Same Organization
Same Work Branch
Self
Self
Self
omnidefend:permissions:core:users:viewUsers:unlockAcctAll Organizations
AllOrganizations
Same Organization
Same Organization (except self)
Same Work Branch (except self)
Same Organization (except self)
Same Work Branch (except self)
omnidefend:permissions:core:users:viewUsers:enrollAuthAll Organizations
AllOrganizations
Same Organization
Same Organization
Same Work Branch
Same Organization
Same Work Branch
Self
Same Organization
Self
Self
omnidefend:permissions:core:users:modifyUsersAll Organizations
AllOrganizations
Same Organization
Same Organization
Same Work Branch
Same Organization
Same Work Branch
Same Organization
omnidefend:permissions:core:users:removeUsersAll Organizations
AllOrganizations
Same Organization
Same Organization
Same Work Branch
Same Organization
Same Work Branch
Organization permissions
omnidefend:permissions:core:organizations:createOrganizationsAll Organizations
AllOrganizations
omnidefend:permissions:core:organizations:viewOrganizationsAll Organizations
AllOrganizations
Same Organization
omnidefend:permissions:core:organizations:modifyOrganizationsAll Organizations
AllOrganizations
Same Organization
omnidefend:permissions:core:organizations:removeOrganizationsAll Organizations
Same Organization
omnidefend:permissions:core:organizations:viewIAMStatisticsAll Organizations
AllOrganizations
Same Organization
Same Organization
Same Work Branch
Same Organization
Same Work Branch
Application permissions
omnidefend:permissions:core:applications:createApplicationsAll Organizations
AllOrganizations
Same Organization
Same Organization
omnidefend:permissions:core:applications:viewApplicationsAll Organizations
AllOrganizations
Same Organization
Same Organization
Self
Same Organization
Self
Self
omnidefend:permissions:core:applications:modifyApplicationsAll Organizations
AllOrganizations
Same Organization
Same Organization
omnidefend:permissions:core:applications:removeApplicationsAll Organizations
AllOrganizations
Same Organization
Same Organization
Role permissions
omnidefend:permissions:core:roles:createRolesAll Organizations
AllOrganizations
Same Organization
Same Organization
omnidefend:permissions:core:roles:viewRolesAll Organizations
AllOrganizations
Same Organization
Same Organization
Same Organization
omnidefend:permissions:core:roles:modifyRolesAll Organizations
AllOrganizations
Same Organization
Same Organization
omnidefend:permissions:core:roles:removeRolesAll Organizations
AllOrganizations
Same Organization
Same Organization
Event logs permissions
omnidefend:permissions:core:eventLogs:viewLogsAll Organizations
AllOrganizations
Same Organization
Same Organization
Same Work Branch
Same Organization
Same Work Branch
Same Organization
Self
Self
omnidefend:permissions:core:eventLogs:removeLogsAll Organizations
AllOrganizations
Same Organization
Same Organization
Same Organization
Reports permissions
omnidefend:permissions:core:reports:createReportsAll Organizations
AllOrganizations
Same Organization
Same Organization
SameOrganization
Same Organization
omnidefend:permissions:core:reports:modifyReportsAll Organizations
AllOrganizations
Same Organization
Same Organization
SameOrganization
Same Organization
omnidefend:permissions:core:reports:runReportsAll Organizations
AllOrganizations
Same Organization
Same Organization
SameOrganization
Same Organization
omnidefend:permissions:core:reports:removeReportsAll Organizations
AllOrganizations
Same Organization
Same Organization
SameOrganization
Same Organization
Server permissions
omnidefend:permissions:core:server:viewServerYes
omnidefend:permissions:core:server:modifyServerYes
omnidefend:permissions:core:server:viewServerHwInfoYes
Portal permissions
omnidefend:permissions:core:portal:portalAccessYes
Yes
Yes
Yes
Yes
Yes
Yes
Yes
Yes
The
user licensefield is also significant. Left click the field to show any licenses available, and select the license you want that user to be assigned to, as seen in the image below: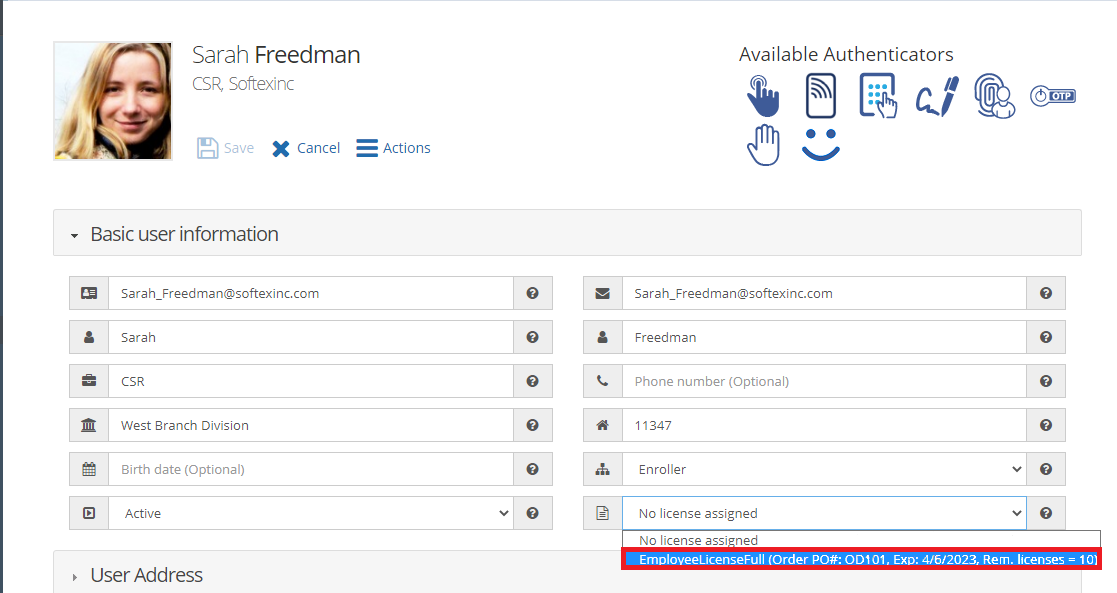
Tip
It is possible to add a user without a license. The user will not be allowed to log in and work normally until a license is assigned.
The
save passwordfield is also significant. If the user does not wish to set a password at this time they would leave this unchecked. By default Password fields will be greyed out when there is no check mark. To set this setting. Click the box then type in a password in the password field and type the same password into the confirm password box. If not checked the new user will need to set a password later. See the image below:
Once all the information has been filled out, the user will have 3 different options to create the user, as seen in the image below:

Option 1 - ``Create``
Createsimply creates the new user and does nothing more.Option 2 - ``Create + New``
Create + Newis an option to use if you are creating more than one user using this method. It finishes this user creates them and populates the Add new user screen to allow you to fill out for the next user.Option 3 - ``Create + Enroll``
Create + Enrollis an option if you are wanting to enroll your user in a device after adding them. In this case it would finish creating the user and take you too enrollment for that user.
2. Adding a User in OmniDefend Import Template Method
To import a new user from a file utilizing a template, click the blue button labelled
Import from filein the top left corner of theAdd Userpage, as shown below: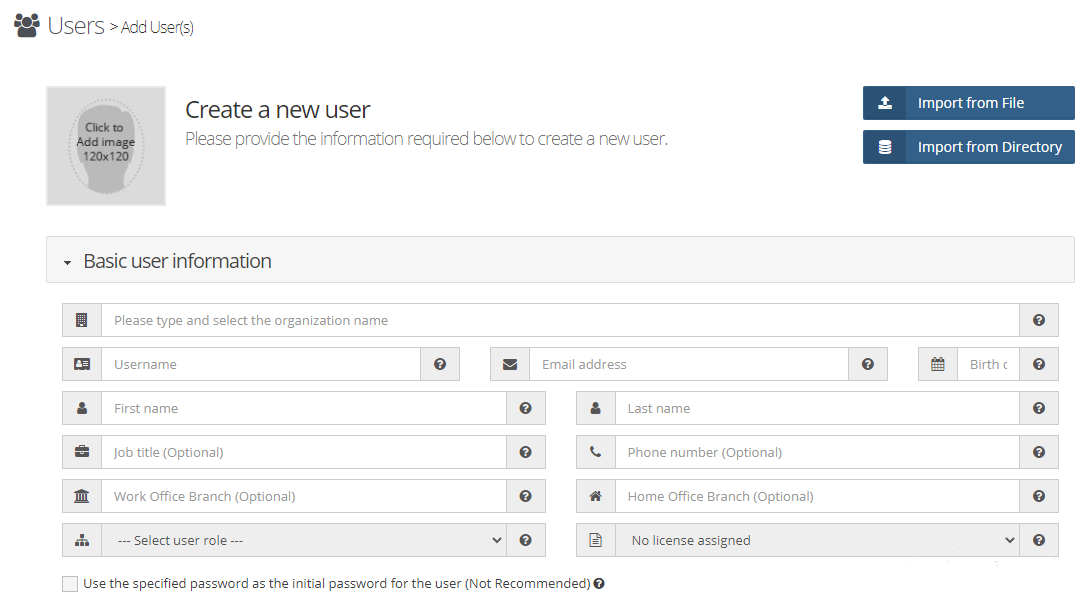
The next page will direct you to fill in an organization name and choose a file to import.
Tip
The organization name is important, as some companies have certain users only in certain organizations.
Tip
Click
herebelow the choose file box to download a sample excel file with an organizational template.The sample file should look similar to the image below:
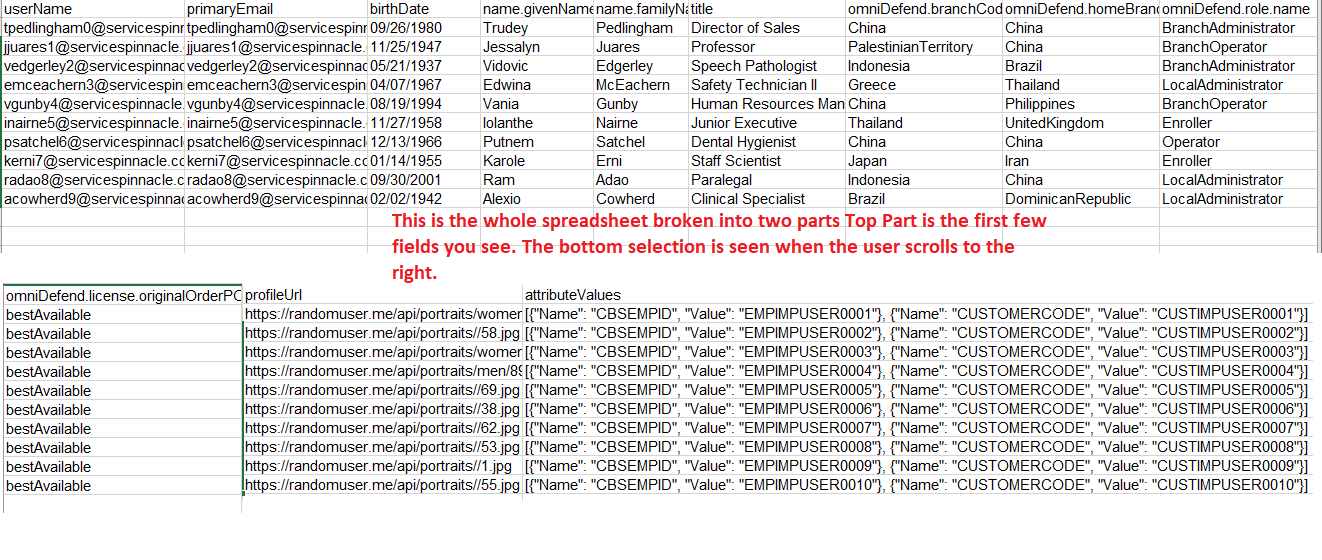
Fill out these 12 fields for 1 user or many users. The sample template shows there are 10 users that will be added. Now that your spreadsheet is filled out copy it somewhere locally and follow the following steps:
Click
uploadto finish the import process.
3. Adding a User through importing from a domain controller
To import a user from the domain controller, navigate to the
add userpage, and click the button titledImport from Directoryas shown in the picture below:The next page will direct you to fill in an organization name and enter in the domain.
Tip
The organization name is important, as some companies have certain users only in certain organizations.
The page will then refresh and look similar to the example below. you should now be able to see a list of users from the domain you joined to OmniDefend if it is configured correctly. Left Click on the check box on the left to select a user to import.

1. Removing Users in OmniDefend
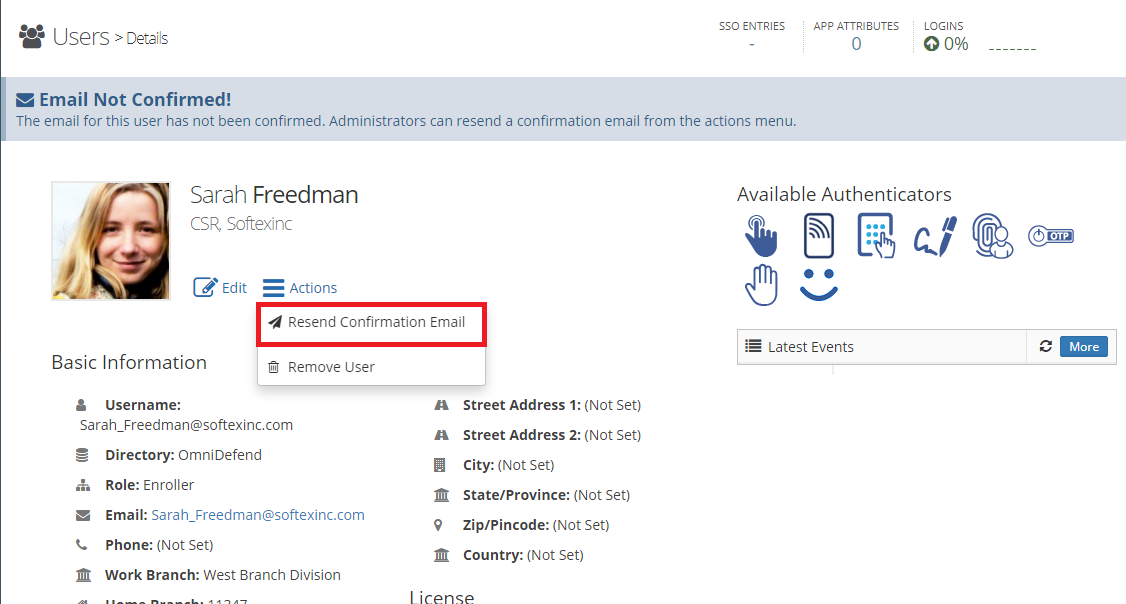
To remove a given user, first navigate to that User’s page. Then, as depicted in the image below, find the
actionsbutton to right of Sarah’s user picture. Choose theRemove Useroption from the dropdown which appears.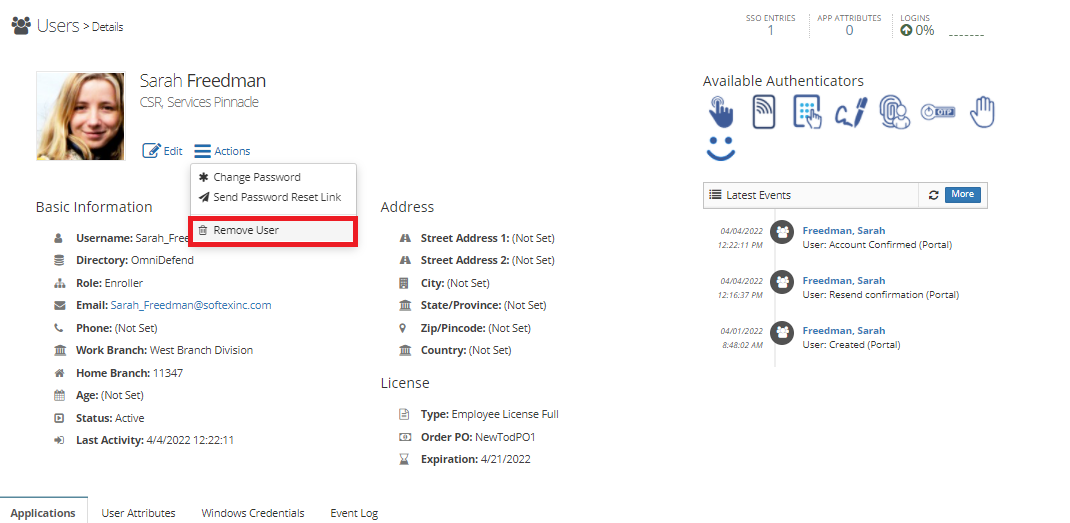
A confirmation box will appear, as shown in the image below. Click
yesto confirm, andnoto cancel and go back to the Users page.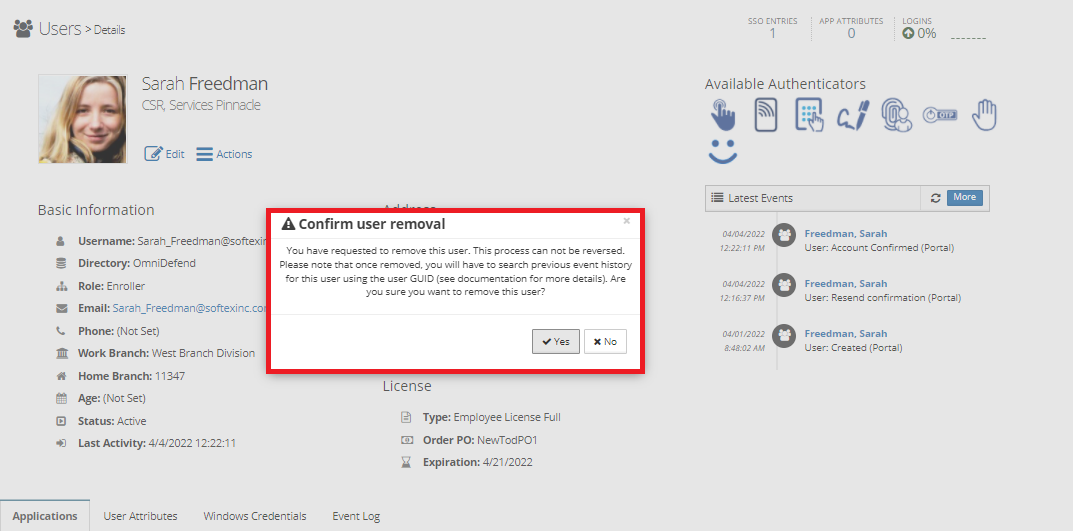
After confirmation, the user will be permanently removed from OmniDefend.

User Licenses and Email Confirmation
It is possible that a User may be added without a license. If this is the case, you will see a brown banner at the top of the Users page like so:
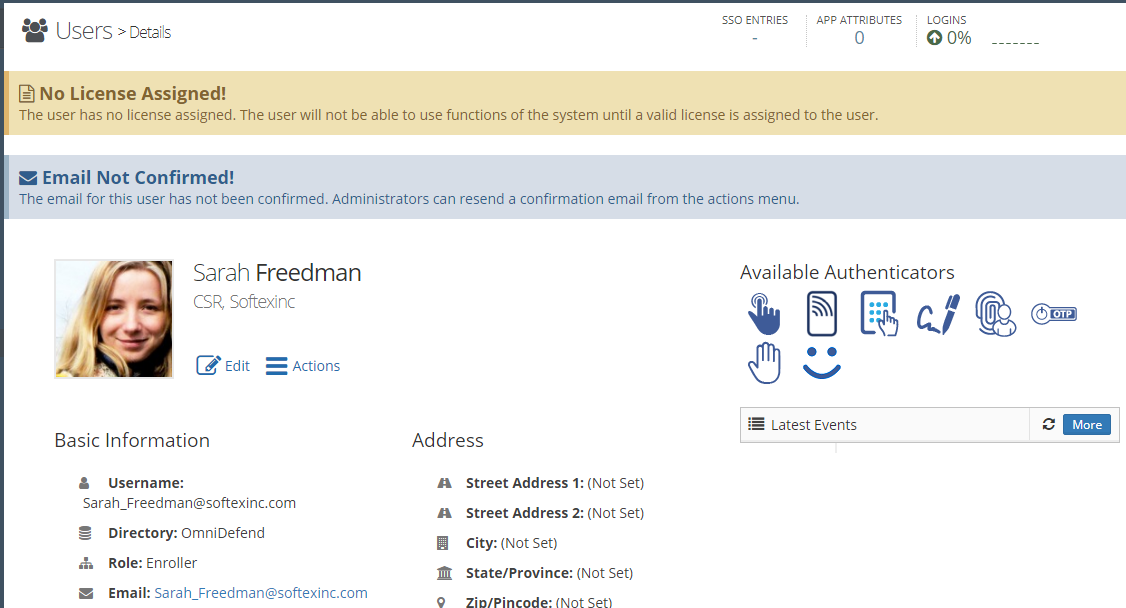
Let’s demonstrate how to correct this with example user Sarah Freedman
On the
Userspage, clickEditto edit profile information, andBasic user informationselect the corresponding dropdown to add a license.Caution
If nothing shows in the drop down the user may have not added a license to the server. The user must add a license to their server prior to these steps in order for it to show here.
After selecting a valid license, click the
Savebutton. If the license was valid, a confirmation message will appear like so: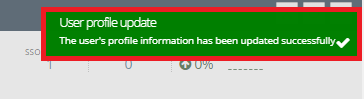
To resend a confirmation, locate the user profile, and select the correct option under the Actions tab, as demonstrated below.
Check the email for that given user, an activation link will be sent in the form of a link, as seen in the image below.
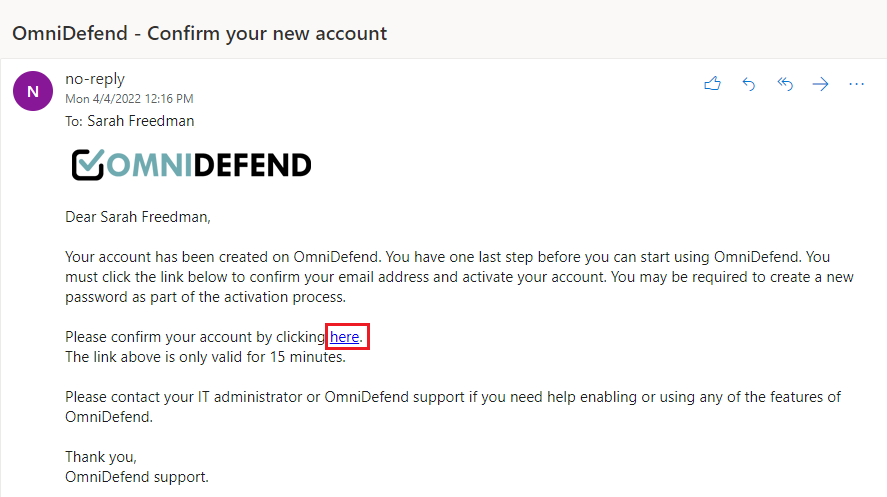
Caution
The activation link will only be valid for 15 minutes. After that time, the process will have to be started over.
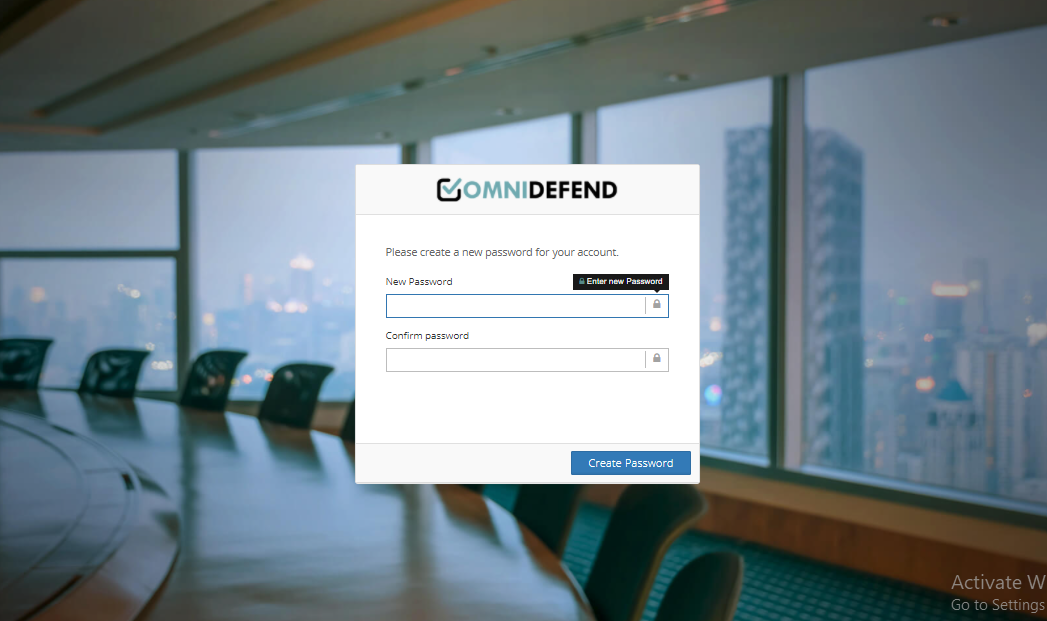
The activation link will direct the user to the following page, where they must enter a new password, and confirm that password in the second box.
PIN Enrollment and Password Change
1. Changing A User’s Password
To change a user’s password, navigate to the user’s page, and left click on
actions.A drop down box populates, as shown in the image below: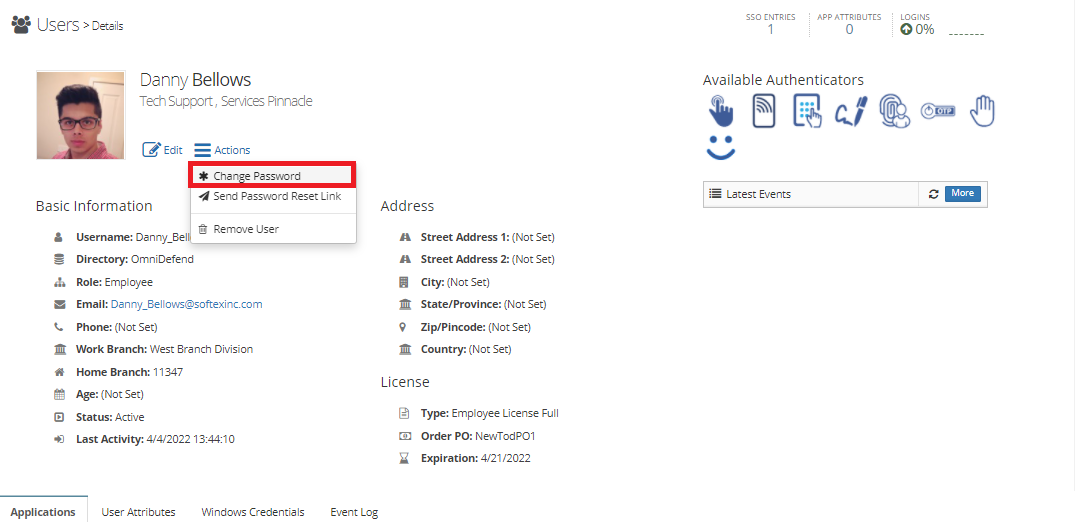
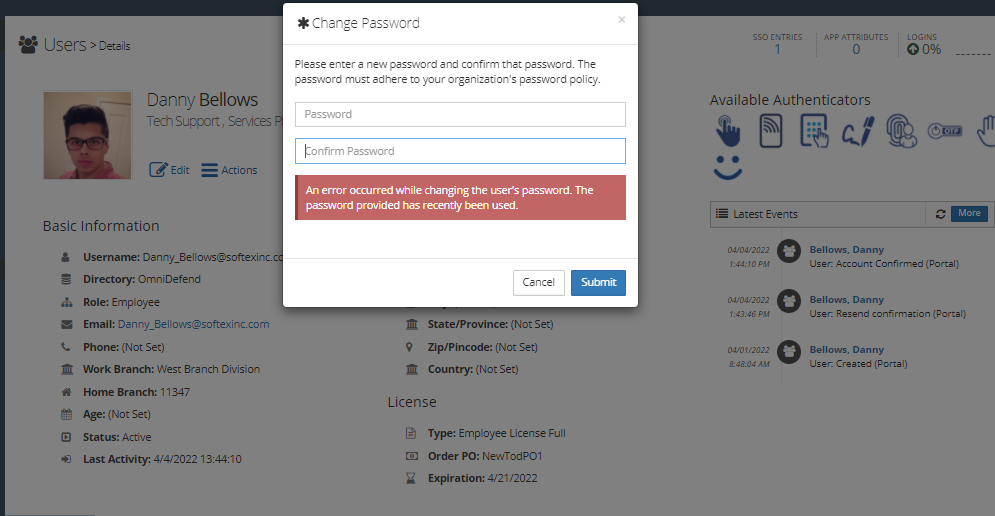
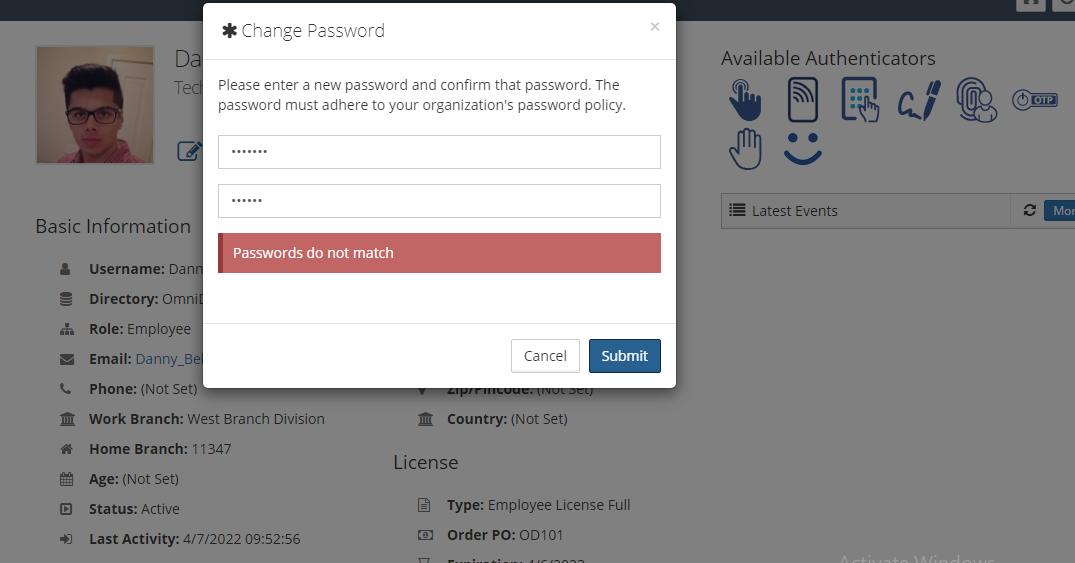
A change password box then populates.
Caution
Make sure to enter a password not previously used, and confirm the password correctly. Failure to do so will prompt an error message, as shown in the images below:
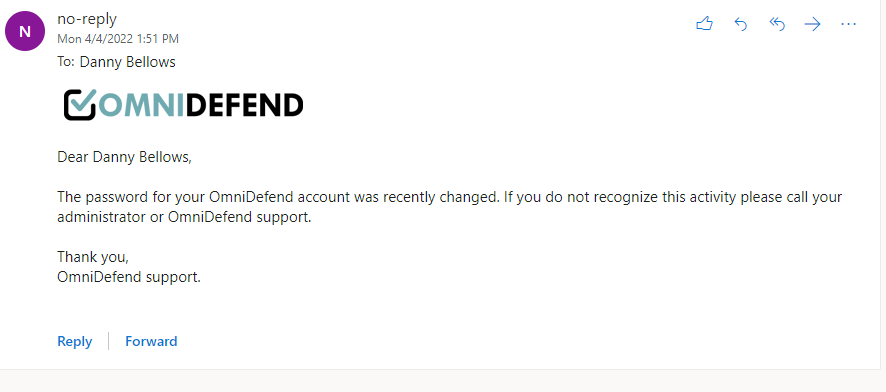
Upon submission of a valid password, the user should recieve a confirmation email, as shown below:
Enrolling a User in OmniDefend PIN
This section demonstrates how to enroll a user in OmniDefend PIN. First navigate to the User’s page (see example Danny Bellows below), and select the
PIN Authenticatoricon.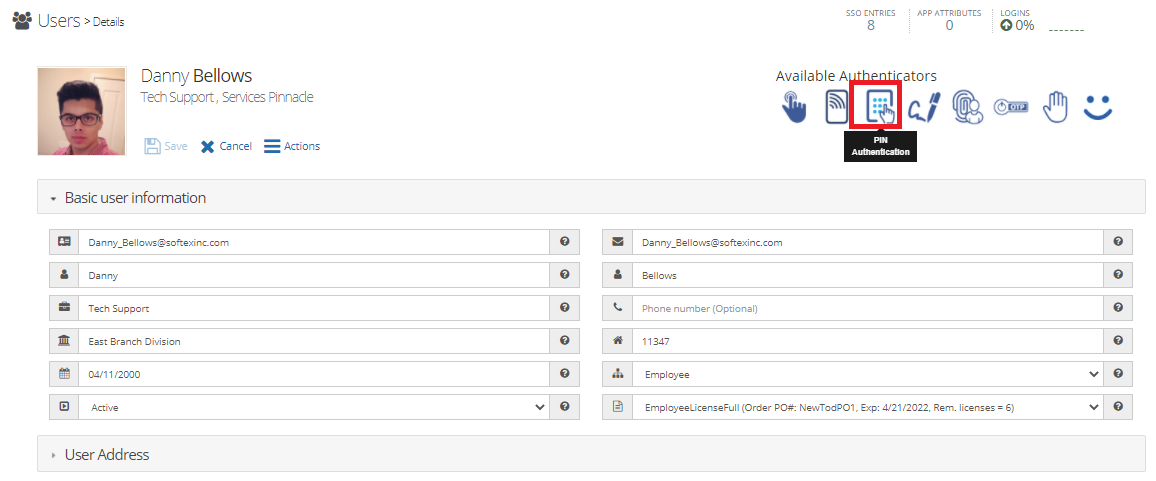
Tip
In the authentication devices section are all the enrollment devices that were set up during server setup.
Next, the user should see a PIN box populate like the screen below:

After you type in the new pin and confirm pin, left-click the
save databutton.Caution
Please ensure to type the same pin in the new pin and confirm pin or the user will get the error message below:
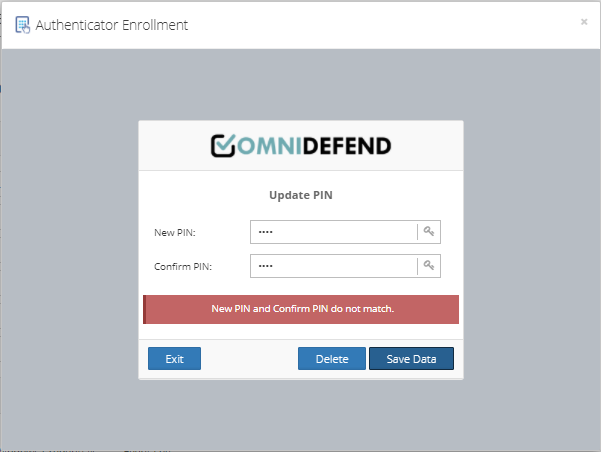
Click
save datato save and confirm.