Installing The Client
A Brief Overview
This document describes how to install OmniDefend client components.
- There are two types of OmniDefend Client Components required.
OmniDefend Chrome Extensions
OmniDefend Clients
OmniDefend Chrome/Edge Extensions should be installed from Google Chrome Store.
OmniDefend Chrome/Edge Extensions
A Chrome/Edge extension is a small program that extends the functionality of the Google Chrome/Microsoft Edge browser. OmniDefend uses extension to access biometric devices and provide Single Sign On capabilities. OmniDefend required following two extensions for MFA and SSO Functionalities.
OmniDefend MFA Extension (Supports OmniDefend MFA functionality with biometric devices) https://chrome.google.com/webstore/detail/omnidefend-mfa-extension/bjmgfifmindcopelajhaahpibmmojkga
OmniDefend SSO Extension (Support OmniDefend SSO functionality for Web Applications and Desktop Applications) https://chrome.google.com/webstore/detail/omnidefend-sso-extension/deeppkmgnnimofmekmncjmncpcbodmbl
OmniDefend SSO extension requires OmniDefend Server Information to connect. Please edit the registry file below (
Clients_Configuration.reg) and update theServerUrl,ClientId,ClientSecret,SupportKioskModeandAutoLoginvalues under Google Chrome Extension Configuraton Information and Microsoft Edge Extension Configuraton Information in registry files. Please install updated registry files on the client systems.Windows Registry Editor Version 5.00 ; -------------------------------------------------- ; Google Chrome Extension Configuraton Information ; -------------------------------------------------- [HKEY_LOCAL_MACHINE\SOFTWARE\Policies\Google] [HKEY_LOCAL_MACHINE\SOFTWARE\Policies\Google\Chrome\3rdparty] [HKEY_LOCAL_MACHINE\SOFTWARE\Policies\Google\Chrome\3rdparty\extensions] [HKEY_LOCAL_MACHINE\SOFTWARE\Policies\Google\Chrome\3rdparty\extensions\deeppkmgnnimofmekmncjmncpcbodmbl] [HKEY_LOCAL_MACHINE\SOFTWARE\Policies\Google\Chrome\3rdparty\extensions\deeppkmgnnimofmekmncjmncpcbodmbl\policy] "ServerUrl"="" "ClientId"="" "ClientSecret"="" "SupportsKioskMode"="" "AutoLogin"="" ; -------------------------------------------------- ; Microsoft Edge Extension Configuraton Information ; -------------------------------------------------- [HKEY_LOCAL_MACHINE\SOFTWARE\Policies\Microsoft] [HKEY_LOCAL_MACHINE\SOFTWARE\Policies\Microsoft\Edge\3rdparty] [HKEY_LOCAL_MACHINE\SOFTWARE\Policies\Microsoft\Edge\3rdparty\extensions] [HKEY_LOCAL_MACHINE\SOFTWARE\Policies\Microsoft\Edge\3rdparty\extensions\deeppkmgnnimofmekmncjmncpcbodmbl] [HKEY_LOCAL_MACHINE\SOFTWARE\Policies\Microsoft\Edge\3rdparty\extensions\deeppkmgnnimofmekmncjmncpcbodmbl\policy] "ServerUrl"="" "ClientId"="" "ClientSecret"="" "SupportsKioskMode"="" "AutoLogin"="" ; ---------------------------------------------------- ; Windows Credential Provider Configuraton Information ; ---------------------------------------------------- [HKEY_LOCAL_MACHINE\SOFTWARE\Softex] [HKEY_LOCAL_MACHINE\SOFTWARE\Softex\OmniDefend\CredProv] "ServerUrl"="" "ClientId"="" "ClientSecret"=""
Manual Installation
Please go to above two links to install the extensions. Please click on “Add to Chrome” blue button to install the extensions. Please update the appropriate registry files and run the registry files to enable the OmniDefend functionalities. The files are listed below:
Chrome Registry Policy
Windows Registry Editor Version 5.00

[HKEY_LOCAL_MACHINE\SOFTWARE\Policies\Google]

[HKEY_LOCAL_MACHINE\SOFTWARE\Policies\Google\Chrome]

[HKEY_LOCAL_MACHINE\SOFTWARE\Policies\Google\Chrome\3rdparty]

[HKEY_LOCAL_MACHINE\SOFTWARE\Policies\Google\Chrome\3rdparty\extensions]

[HKEY_LOCAL_MACHINE\SOFTWARE\Policies\Google\Chrome\3rdparty\extensions\deeppkmgnnimofmekmncjmncpcbodmbl]

[HKEY_LOCAL_MACHINE\SOFTWARE\Policies\Google\Chrome\3rdparty\extensions\deeppkmgnnimofmekmncjmncpcbodmbl\policy]
"ServerUrl"=""
"ClientId"=""
"ClientSecret"=""
"SupportsKioskMode"=""
"AutoLogin"=""
Edge Registry Policy
Windows Registry Editor Version 5.00

[HKEY_LOCAL_MACHINE\SOFTWARE\Policies\Microsoft]

[HKEY_LOCAL_MACHINE\SOFTWARE\Policies\Microsoft\Edge]

[HKEY_LOCAL_MACHINE\SOFTWARE\Policies\Microsoft\Edge\3rdparty]

[HKEY_LOCAL_MACHINE\SOFTWARE\Policies\Microsoft\Edge\3rdparty\extensions]

[HKEY_LOCAL_MACHINE\SOFTWARE\Policies\Microsoft\Edge\3rdparty\extensions\deeppkmgnnimofmekmncjmncpcbodmbl]

[HKEY_LOCAL_MACHINE\SOFTWARE\Policies\Microsoft\Edge\3rdparty\extensions\deeppkmgnnimofmekmncjmncpcbodmbl\policy]
"ServerUrl"=""
"ClientId"=""
"ClientSecret"=""
"SupportsKioskMode"=""
"AutoLogin"=""
CredProv Setting Registry File
Windows Registry Editor Version 5.00

[HKEY_LOCAL_MACHINE\SOFTWARE\Softex]

[HKEY_LOCAL_MACHINE\SOFTWARE\Softex\OmniDefend\CredProv]
"ServerAddress"=""
"ClientId"=""
"ClientSecret"=""
Deploy Extension via Group Policy
System administrator can use group policy to deploy the Chrome/Edge extension on required systems.
Chrome Extension:
Please perform following steps on the domain controller server.
Check if
C:\Windows\PolicyDefinitions\chrome.admx” and “C:\Windows\PolicyDefinitions\en-US\chrome.admlfile exist on server. Please skip to step 6, if file exist.Download google policy templates at https://dl.google.com/dl/edgedl/chrome/policy/policy_templates.zip
Unblock and unzip the downloaded
policy_templates.zipCopy
\windows\admx\chrome.admxfile underC:\Windows\PolicyDefinitions.Copy
\windows\admx\en-US\chrome.admlfile underC:\Windows\PolicyDefinitions\en-USGo to
Start → Run. Typegpmc.mscand click OK to launch Group Policy Management.Under Group Policy Management, open a node of Server Domain and select
EDITby right click to Default Domain Policy. This action will open Group Policy Management Editor as you can see below.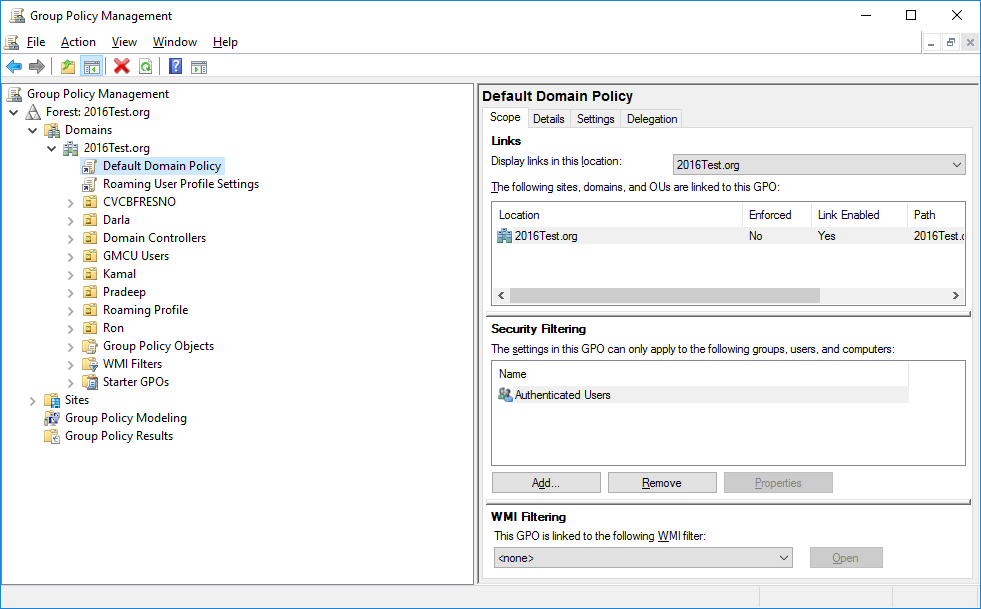
Under Group policy management Editor. Select
Computer Configuration > Policies > Administrative Templates/Google Chrome/ExtensionsoptionSelect and double click on the
Configure the list of force-installed apps and extensionsoption. SelectEnabledradio button. This action will enable theShowbutton under Options:Click Show button and add following two entries. If you already have entries in the
Show Contentswindow, please add following two entries at the end. Click OK on theShow Contentswindow and Click Apply on theConfigure the list of force-installed apps and extensionswindow.
bjmgfifmindcopelajhaahpibmmojkga;https://clients2.google.com/service/update2/crxdeeppkmgnnimofmekmncjmncpcbodmbl;https://clients2.google.com/service/update2/crx
Select and double click on the “Extension management settings” option. Select “Enabled” radio button. This action will enable the text box below Extension management settings under Options. Add following text in the text box. If you already have text in the text box, please add following text at the end.
{"bjmgfifmindcopelajhaahpibmmojkga": {"update_url":"https://clients2.google.com/service/update2/crx","override_update_url":true,"installation_mode":"force_installed"},"deeppkmgnnimofmekmncjmncpcbodmbl":{"update_url":":"https://clients2.google.com/service/update2/crx","override_update_url":true,"installation_mode":"force_installed ","toolbar_pin":"force_pinned"}}
Once Group Policy applied to the user’s system, The Chrome Extensions will automatically get installed on the user’s system. To forcefully apply the policy, run
gpupdate /forcein Command Prompt with Elevated Rights [Administrator Mode] on user’s system.Edge Extension:
Please perform following steps on the domain controller server.
Check if
C:\Windows\PolicyDefinitions\msedge.admxandC:\Windows\PolicyDefinitions\en-US\msedge.admlfile exist on server. Please skip to step 6, if file exist.Download Edge policy templates at https://www.microsoft.com/en-us/edge/business/download
Unblock and unzip the downloaded
MicrosoftEdgePolicyTemplates.zipCopy
\windows\admx\msedge.admxfile underC:\Windows\PolicyDefinitions.Copy
\windows\admx\en-US\msedge.admlfile underC:\Windows\PolicyDefinitions\en-USGo to
Start → Run. Typegpmc.mscand click OK to launch Group Policy Management.Under Group Policy Management, open a node of Server Domain and select
EDITby right click to Default Domain Policy. This action will open Group Policy Management Editor.Under Group policy management Editor. Select
Computer Configuration > Policies > Administrative Templates/Microsoft Edge/ExtensionsoptionSelect and double click on the
Control which extensions are installed silentlyoption. SelectEnabledradio button. This action will enable theShowbutton under Options:Click Show button and add following two entries. If you already have entries in the “Show Contents” window, please add following two entries at the end. Click OK on the “Show Contents” window and Click Apply on the “Configure the list of force-installed apps and extensions” window.
bjmgfifmindcopelajhaahpibmmojkga;https://clients2.google.com/service/update2/crxdeeppkmgnnimofmekmncjmncpcbodmbl;https://clients2.google.com/service/update2/crx
Select and double click on the “Extension management settings” option. Select “Enabled” radio button. This action will enable the text box below Extension management settings under Options. Add following text in the text box. If you already have text in the text box, please add following text at the end.
{"bjmgfifmindcopelajhaahpibmmojkga": {"update_url":"https://clients2.google.com/service/update2/crx","override_update_url":true,"installation_mode":"force_installed"},"deeppkmgnnimofmekmncjmncpcbodmbl":{"update_url":":"https://clients2.google.com/service/update2/crx","override_update_url":true,"installation_mode":"force_installed","toolbar_state":"force_shown"}}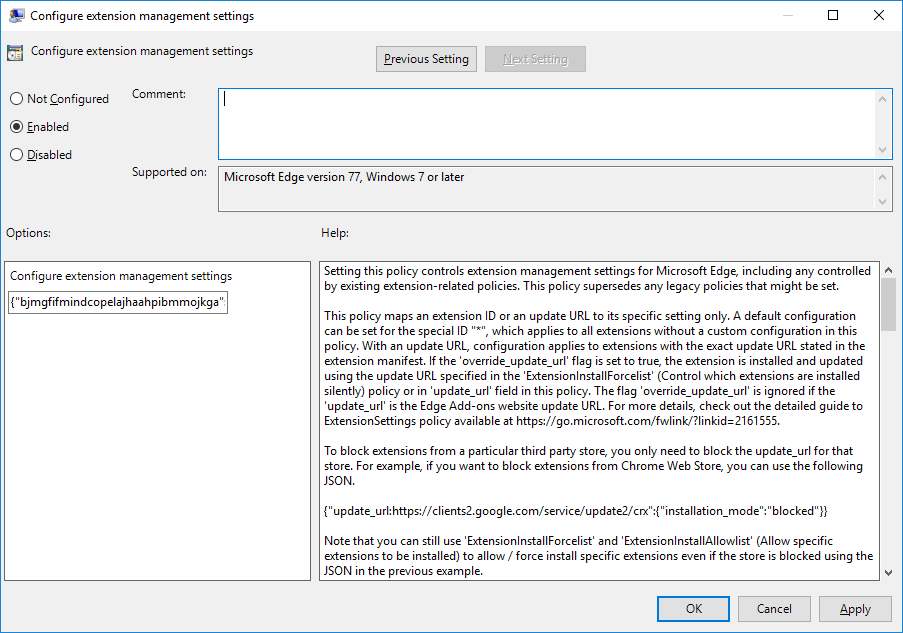
12. Once Group Policy applied to the user’s system, The Chrome Extensions will automatically get installed on the user’s system. To forcefully apply the policy, run
gpupdate /forcein Command Prompt with Elevated Rights [Administrator Mode] on user’s system. 1. Universal SSO Engine. The OmniDefend SSO Enginge can be an identity provider to any site that complies with the above standards. 2. Desktop Applications. TheOmniVaultsecurely replays the username and password into the login screen. Terminal emulator applications are compatible as well. 3. SSO Store. The SSO store allows an organization to quickly pull the SSO profile for any given application into the login portal. 4. Multifactor Authentication. Using an industry leading variety of MFA compatible biometric devices 5. Directory Integration 6. Federation
OmniDefend Client .exe Installation
OmniDefend clients should be downloaded from OmniDefend Server and must be installed to use OmniDefend functionalities.
Standard Deployment 1. OmniDefend MFA Client (Supports OmniDefend MFA functionality with biometric devices)
https://<server_url>/api/modules/installed/OmniDefend.WebAuth.Api.Server-<version_number>/download/OmniDefend%20MFA%20Client%20(64-bit).exe2. OmniDefend SSO Client (Support OmniDefend SSO functionality for Desktop Applications)
https://<server_url>/api/modules/installed/OmniDefend.Vault.Api.Server-<version_number>/download/OmniDefend%20SSO%20Client%20(64-bit).exe3. OmniDefend Credential Provider Client (Support Windows Login functionality using OmniDefend)
https://<server_url>/api/modules/installed/OmniDefend.WinLogon.Api.Server-<version_number>/download/OmniDefend%20Credential%20Provider%20Client%20(64-bit).exe4. OmniDefend Client Bundle (Install MFA Client, SSO Client and Credential Provider Client together)
https://<server_url>/api/modules/installed/OmniDefend.WebAuth.Api.Server-<version_number>/download/OmniDefend%20Client%20Bundle%20(64-bit).exeDeploy OmniDefend Client Software to remote computers`
System administrator can deploy the registry file and OmniDefend client software to remote computers on the required systems.
Supported commands for the remote deployment:
Install: /iUninstall: /uSilent: /sFor example, installing/upgrading OmniDefend MFA client silently, you should run:“OmniDefend MFA Client (64-bit).exe” /i /s
OmniDefend Client .msi Installation
OmniDefend clients also can be deployed remotely using MSI files. You can request separate MSI files instead of bundle exe.
OmniDefend Credential Provider Client requires OmniDefend Server Information to connect. Please edit provided registry file Clients_Configuration.reg and update the ServerAddress, ClientId and ClientSecret values under Windows Credential Provider Configuraton Information section in registry file. Please install updated registry file on the client systems.
MFA Client (Supports OmniDefend MFA functionality with biometric devices)
Required Module:
OmniDefend
MFA Core Module.msi: This is required module for the OmniDefend MFA functionality.Device Specific Plugin Module
OmniDefend WBF Plugin.msi: This plugin module supports fingerprint matching capability of MFA functionality using WBF Drivers.
OmniDefend Futronics Plugin.msi: This plugin module supports fingerprint matching capability of MFA functionality using Futronic Drivers.
OmniDefend PalmSecure Plugin.msi: This plugin module supports Fujitsu PalmSensor matching capability of MFA functionality.
OmniDefend PCSC Plugin.msi: This plugin module supports Badge matching capability of MFA functionality.OmniDefend SSO Client (Support OmniDefend SSO functionality for Desktop Applications)
Required Module:
OmniDefend SSO Core Module.msi: This is required module for the OmniDefend SSO functionality.OmniDefend Credential Provider Client (Support Windows Login functionality using OmniDefend)
Required Module:
OmniDefend UI Broker Module.msi: This is required module for the Windows Login functionality.
OmniDefend Credential Provider Client.msi: This is required module for the Windows Login functionality.